Introduction
Welcome to the Exergy Documentation - your guide to the soverign smart building - maximzing efficiency and monetizing heat.
What is Exergy?
Exergy provides hardware, software, and services that make it easy to integrate bitcoin miners into building heating and solar systems. Our solutions connect:
- Bitcoin Mining Hardware - Devices that convert electricity into heat & money
- Smart Home Control Brains - Self-hosted, sovereign home servers that marry together miners, power generation, heating systems and more via IoT management software
- Open Source Code - Applications, integrations, automations, and dashboards that marry bitcoin miners to your smart building control, with endlessly customizable automations and dashboards
Documentation Structure
| Section | Description |
|---|---|
| DIY | Build your own soverign system with Exergy integrations, blueprints, and templates |
| Reference | Reference specifications, troubleshooting, and FAQ |
Getting Help
If you need assistance:
- Review the documentation FAQ
- Ask the community on our Support Forum
- Contact Exergy for product and service inquiries
DIY Overview
The core piece of a sovereign smart home is a physical computer (home brain) that lives in your building, running 24/7 to manage all smart devices.
Hashrate heaters, small desktop bitcoin miners, thermostats, lights, alarms, blinds, etc… are all smart devices that need to connect to the home brain to talk to one another and operate as a cohesive system.
This section walks through our open-source documentation on how to build and run your own self-hosted smart home brain, integrate bitcoin miners and hashrate heaters into the broader home IoT network, and build automations and dashboards that help you take advantage of hashrate heating.
Why DIY?
- Learn - Understand, inspect and verify every component of your system
- Customize - Build exactly what you need, nothing more
- Save - Use hardware you already own
- Self-sovereign - No reliance on any specific vendor or service provider
Sovereign Smart Home Brains
1. Home Assistant
Home Assistant OS (HAOS) is a minimalistic, embedded operating system optimized for running the Home Assistant smart home platform, providing a robust, maintenance-free environment for local automation on devices like single-board computers or dedicated hardware.
| Section | Description |
|---|---|
| Build Your Own HA Brain | Build and set up your Home Assistant smart device control brain on various hardware systems |
| HA Integrations | Use Exergy integration applications to connect bitcoin miners and more to your smart home |
| HA Blueprints | Automation templates that define when things run, what they connect to, and more |
| HA Dashboards | Visualize your sovereign smart home and control everything remotely |
Home Assistant DIY Overview
Step 1: Set Up Home Assistant
- Build the required hardware and install Home Assistant. Complete the setup and configure get your home brain ready for hashrate heating.
Exergy Home Assistant Documentation for StartOS and Umbrel servers coming soon.
Step 2: Set Up Hashrate Heating Hardware
- Choose your favorite bitcoin mining heater (Avalon Mini 3, Avalon Q, or Nano 3s), follow the initial device setup and connect it to your local network.
Step 3: Add Integrations
- Install the Exergy integrations (like applications on HA) to easily connect and manage your hashrate heaters in your soverign smart home, with real time control and data read outs.
Step 4: Configure Automations
Exergy HA Automation Blueprints
- Use our blueprints as a starting point, or build your own automations from scratch. Tie together heat, thermostats, miners, temperature sensors, timing, and more.
Step 5: Build Your Dashboard
- Create a control interface using our templates or design your own. Visualize everything at a glance and control from anywhere.
GitHub
Find all open-source Exergy code on our Github:
Contributing
We welcome contributions:
- Bug reports and fixes
- New automation blueprints
- Dashboard improvements
- Documentation updates
See individual GitHub repositories for contribution guidelines.
Community
- Community Guides Forum - Share your smart home automations, dashboards and discover tips
- Software Support Forum - Get help with specific issues
- GitHub Issues - Report bugs, request features, submit PRs
Home Assistant
Home Assistant is a free, open-source home automation platform that puts local control and privacy first. It’s an excellent foundation for hashrate heating and monetizing solar. Custom Exergy integrations enable bitcoin miners to easily become IoT devices that can interact with and be controled via a smart home interface.
Why Home Assistant?
Self-Hosted & Sovereign
- Runs on your hardware - No cloud dependency
- Your data stays local - Privacy by design
- No subscriptions - One-time hardware cost, free software
- Works offline - Internet outage doesn’t break your local device control
Powerful Automation
- Create complex rules without coding
- Trigger actions based on temperature, time, energy prices, and more
- Combine multiple devices into unified control—not locked into any device ecosystem
Massive Ecosystem
- 2,000+ integrations available
- Works with virtually any smart home device—now including bitcoin miners
- Active community with constant improvements—not reliant on Exergy for everything
What You’ll Find in This Section
This documentation covers running Home Assistant with Exergy integrations bitcoin mining and hashrate heating:
- Build Your Own HA Brain - Hardware and software setup to run your own Home Assistant
- Exergy HA Integrations - Connect your bitcoin miners to Home Assistant
- Automation Blueprints - Pre-built automations for hashrate heating and home mining
- Dashboard Templates - Monitor and control your home bitcoin miner systems
Learn More About Home Assistant
For deeper Home Assistant knowledge beyond hashrate heating:
- Home Assistant Official Docs - Comprehensive documentation
- Home Assistant Community - Forums and help
- Home Assistant YouTube - Video tutorials
Build Your Own Home Assistant Brain
Build or purchase your own Home Assistant controller to serve as the brain in your sovereign smart home.
Platform Options
| Platform | Best For | Guide |
|---|---|---|
| Raspberry Pi | Most DIYers, dedicated HA device with a few extra features | Full guide |
| StartOS | Sovereign focused home server with advanced networking | Coming soon |
| Umbrel | Sovereign focused home server | Coming soon |
What You’ll End Up With
Raspberry Pi + Home Assistant OS
Best for: Dedicated HA device
This is the path our product kits use. You’ll end up with essentially the same system we sell, but built yourself.
StartOS Server + Home Assistant (Container)
Best for: Users who want HA alongside their Bitcoin node and other StartOS services
Run Home Assistant in a container as a service on StartOS, integrated with your sovereign computing stack.
StartOS Guide → coming soon
Umbrel Server + Home Assistant (Container)
Best for: Users who want HA alongside their Bitcoin node and other Umbrel services
Run Home Assistant in a container as an application on Umbrel, integrated with your sovereign computing stack.
Umbrel Guide → coming soon
Where to Buy
- Exergy Dedicated Home Assistant kits for Exergy systems
- Home Assistant Plug and play Home Assistant brains
- Start9 Labs Robust Bitcoin native home servers with advanced security and privacy
- Umbrel Bitcoin native home servers with a focus on simplicity
Other Platforms
Home Assistant runs on many platforms:
- Docker on any Linux system
- Virtual machine on Windows/Mac
- Old laptops or mini PCs
- Proxmox, TrueNAS, Synology…
The Exergy integrations work on any Home Assistant installation. Our guides focus on common paths, but the concepts apply anywhere.
See the official Home Assistant installation guide for all options.
Raspberry Pi + Home Assistant
Build a Home Assistant controller on Raspberry Pi - the same platform used in Exergy kits.
Guide Overview
This guide walks you through building a Raspberry Pi-based Home Assistant “brain” - a small home server that controls your bitcoin mining heaters and monitors your home environment.
The guide is split into two parts:
- Hardware Setup - Assembling your Raspberry Pi and components
- System Configuration - Installing and configuring Home Assistant OS
Before diving into those tutorials, review this page to understand what you’ll need and why.
Required Components
| Component | Description |
|---|---|
| Raspberry Pi 5 | A small single-board computer that runs Home Assistant OS. This is the “brain” of your smart home system. 4GB or 8GB RAM models both work. |
| Power Supply | Powers the Raspberry Pi. Use the official 27W USB-C power supply - inadequate power causes instability and crashes. |
| NVMe M.2 SSD | Where your data is stored. Home Assistant writes sensor data frequently, so solid-state storage is essential. 128GB-256GB recommended. |
| NVMe Expansion HAT | An add-on board that connects the NVMe SSD to the Raspberry Pi. Required since the Pi doesn’t have a built-in M.2 slot. |
| Case with Cooling Fan | Keeps the Pi cool and quiet. Active cooling (a fan) is recommended since the Pi 5 runs warm under load. |
| Ethernet Cable | Cat5e or better. Required for initial setup. |
Optional Components
| Component | Description |
|---|---|
| Zigbee Coordinator | A USB or radio-to-pi_hat antenna that listens for Zigbee radio signals (not WiFi). Enables communication with Zigbee sensors and devices like temperature sensors. Recommended to minimize Wi-Fi connected devices in the home and increase stability. |
For Installing Home Assistant OS
You’ll need one of the following setups to flash Home Assistant OS onto your NVMe SSD. See System Configuration for details on each method.
Option A: Network Installer (Recommended)
| Component | Description |
|---|---|
| HDMI Cable | To connect Pi to a display. Some cases/expansion boards include full-size HDMI ports; otherwise you’ll need a Micro-HDMI to HDMI cable or adapter. |
| Monitor or TV | Any display with HDMI input to see the installer GUI. |
| USB Keyboard | To navigate the Network Installer menus. |
Option B: Raspberry Pi Imager
| Component | Description |
|---|---|
| NVMe-to-USB Adapter | Allows you to connect your NVMe SSD to a computer for flashing before installing it in the Pi case. |
| Computer | Mac, Windows, or Linux computer to run Raspberry Pi Imager. |
Important: Don’t Use MicroSD Cards
The Raspberry Pi has a microSD card slot, and Home Assistant OS can run from an SD card. However, this is not recommended.
Home Assistant continuously writes sensor data, logs, and database updates. This constant read/write activity wears out microSD cards quickly - often within months. When the card fails, you lose your configuration and automation history.
Always use an NVMe SSD for reliable, long-term operation. It’s faster and will last years instead of months.
Network Requirements
For initial setup: You must connect via Ethernet cable. Home Assistant OS needs a wired connection for first-time configuration.
After setup: You can switch to WiFi through Home Assistant settings if preferred.
Where to Buy Components
Here’s our Recommended Setup
| Component | Recommended Products | Where to Buy |
|---|---|---|
| Raspberry Pi 5 (8GB) | Raspberry Pi 5 | Amazon, Micro Center, PiShop |
| Power Supply | Official 27W USB-C | Amazon, Micro Center, PiShop |
| NVMe SSD | Samsung 970 EVO Plus, WD Blue SN570 | Amazon, Micro Center, Newegg |
| NVMe Expansion Card + Case | Argon ONE V5 NVMe Base | Amazon |
| Zigbee Coordinator | Argon Industria / Sonoff | Amazon (Works With Argon One V5 Case Only), Amazon |
Tools Needed
If you purchased a complete Raspberry Pi kit designed for Home Assistant, you likely have everything ready to assemble.
If you’re sourcing components separately, you may need:
- Small Phillips screwdriver - For mounting the Pi in the case and attaching the NVMe HAT
- Thermal paste or thermal pads - Often included with cases, but verify before assembly
Next Steps
Ready to build? Start with Hardware Setup to assemble your components. Just need to configure Home Assistant OS? Start with System Configuration to get things dialed in.
Hardware Setup
This guide walks through physically assembling and connecting your Raspberry Pi hardware in preparation for installing Home Assistant OS.
If you haven’t gathered your components yet, see Raspberry Pi + Home Assistant for the full list of required and optional hardware.
Pre-Assembled Brain
If you purchased a pre-assembled Raspberry Pi Home Assistant brain (or already have yours built), skip to Step 2: Connect to Ethernet.
Step 1: Assemble Your Hardware
There are many Raspberry Pi cases, NVMe expansion boards, and cooling solutions available. Assembly varies by kit, so follow the instructions that came with your specific components.
General assembly typically involves:
- Install the NVMe SSD into your expansion HAT or case’s M.2 slot
- Mount the Raspberry Pi into the case or onto the expansion board
- Attach cooling - install heatsinks, thermal pads, or connect the cooling fan
- Close the case and secure any screws
Tip: If your case includes a Zigbee module (like the Argon ONE V5 with Industria), install it now per the manufacturer’s instructions. USB Zigbee dongles can be plugged in later.
Step 2: Connect to Ethernet
Plug an Ethernet cable into:
- The Ethernet port on your Raspberry Pi
- An available port on your router or network switch
Ethernet is required for the initial Home Assistant setup. You can switch to WiFi later if needed.
Step 3: Connect Power
Plug the power supply into your Raspberry Pi.
Ensure your power supply is switched on if it has a switch.
The device will likely boot automatically - Many raspberry pi cases have no power button. If your case has a power button, press it once. You’ll see indicator lights come on, and the fan (if equipped) will spin up.
Wait 2-3 minutes for the initial boot to complete before proceeding.
Next Steps
Your hardware is ready. Continue to System Configuration to install and set up Home Assistant OS.
System Configuration
This guide walks through installing Home Assistant OS on your Raspberry Pi and configuring it for Exergy integrations.
Prerequisites:
- Assembled Raspberry Pi hardware (Hardware Setup)
- Components for your chosen flashing method (see Raspberry Pi overview)
Step 1: Flash Home Assistant OS
There are two methods to install Home Assistant OS on your NVMe SSD. Choose the one that fits your setup.
Method A: Network Installer (Recommended)
This method uses the Raspberry Pi’s built-in Network Installer. It’s simpler if you have a display and keyboard available.
What you need:
- HDMI cable (some cases have full-size HDMI ports; otherwise use Micro-HDMI to HDMI)
- Monitor or TV with HDMI input
- USB keyboard
- Ethernet connected to your router
Steps:
-
Connect display and keyboard
- Plug HDMI cable into your Pi and monitor/TV
- Connect USB keyboard to Pi
- Ensure Ethernet is connected
-
Power on the Pi
- If your NVMe SSD is blank (no OS installed), the Pi will automatically boot into the Network Installer
- You’ll see the Raspberry Pi logo, then the installer interface
-
Select Home Assistant OS
- Use the keyboard to navigate the installer menu
- Select Other specific-purpose OS
- Select Home assistants
- Select Home Assistant OS
- Choose the version for your Pi model (e.g., Pi 5)
-
Select your NVMe drive
- Choose your NVMe SSD as the installation target
- Confirm the selection
-
Wait for installation
- The installer will download and flash Home Assistant OS
- This may take 5-15 minutes depending on your internet speed
-
Reboot
- Once complete, the Pi will reboot automatically
- You can disconnect the HDMI and keyboard after this
Method B: Raspberry Pi Imager (Alternative)
This method flashes the NVMe SSD from your computer before installing it in the Pi case. Use this if you don’t have a display/keyboard, or prefer to flash beforehand.
What you need:
- NVMe-to-USB adapter/enclosure
- Computer (Mac, Windows, or Linux)
Steps:
-
Connect NVMe to your computer
- Insert the NVMe SSD into your USB adapter
- Connect the adapter to your computer
-
Download Raspberry Pi Imager
- Go to raspberrypi.com/software
- Download and install the Imager for your operating system
-
Open Raspberry Pi Imager
-
Select your device
- Click Choose Device
- Select your Raspberry Pi model (e.g., Raspberry Pi 5)
-
Select the operating system
- Click Choose OS
- Select Other specific-purpose OS
- Select Home assistants
- Select Home Assistant OS
- Choose the correct variant for your Pi
-
Select storage
- Click Choose Storage
- Select your NVMe SSD (be careful to select the correct drive!)
-
Write the image
- Click Next
- When asked to customize settings, select No (Home Assistant handles this)
- Click Yes to confirm
- Wait for the write and verification to complete
-
Install the NVMe in your Pi
- Safely eject the drive from your computer
- Install the NVMe SSD into your Pi case/HAT
- Connect Ethernet and power
Step 2: First Boot
After flashing, the first boot takes longer than normal. Home Assistant needs to:
- Resize partitions to use the full SSD
- Download and install updates
- Initialize the database
Wait 10-20 minutes before attempting to access Home Assistant. The Pi’s activity LED will flash during this process.
Step 3: Access Home Assistant
Once the first boot is complete, you can access Home Assistant in several ways.
Option A: Home Assistant Companion App (Mobile)
-
Download the Home Assistant app:
-
Open the app and tap Continue
-
The app will automatically search for Home Assistant instances on your network
-
Select your Home Assistant when it appears
Option B: Web Browser (Recommended)
-
Open a web browser on any device connected to the same network
-
Navigate to: http://homeassistant.local:8123
-
If that doesn’t work, try the IP address method below
Option C: IP Address (Fallback)
If homeassistant.local doesn’t resolve on your network:
-
Find your Pi’s IP address using one of these methods:
- Check your router’s admin panel for connected devices
- Use a network scanner app like Fing (mobile) or Advanced IP Scanner (Windows)
- Look for a device named “homeassistant” or the Pi’s MAC address
-
Navigate to: http://[IP_ADDRESS]:8123
- Example:
http://192.168.1.100:8123
- Example:
Step 4: Account Setup
When you first access Home Assistant, you’ll see the onboarding wizard.
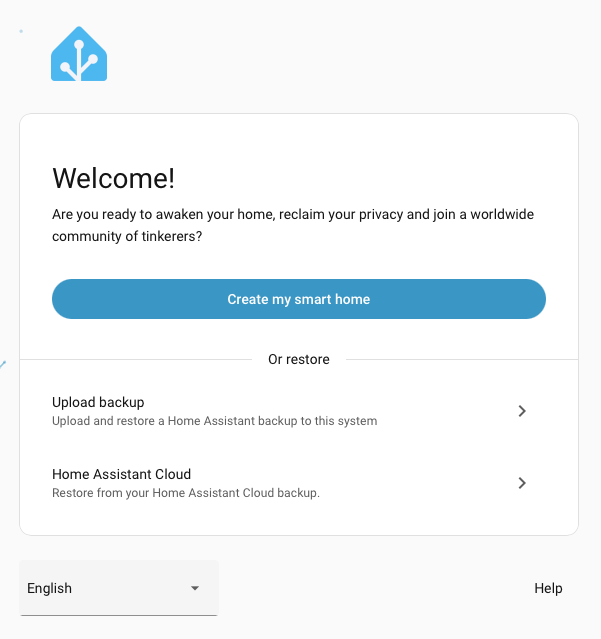
1. Welcome Screen
Click Create my smart home to begin setup.
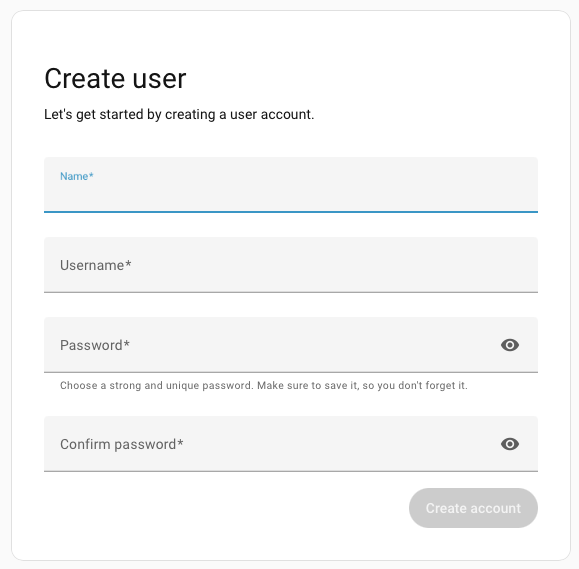
2. Create Your Account
Enter your name, choose a username, and create a strong password. This is the main administrator account - keep these credentials safe.
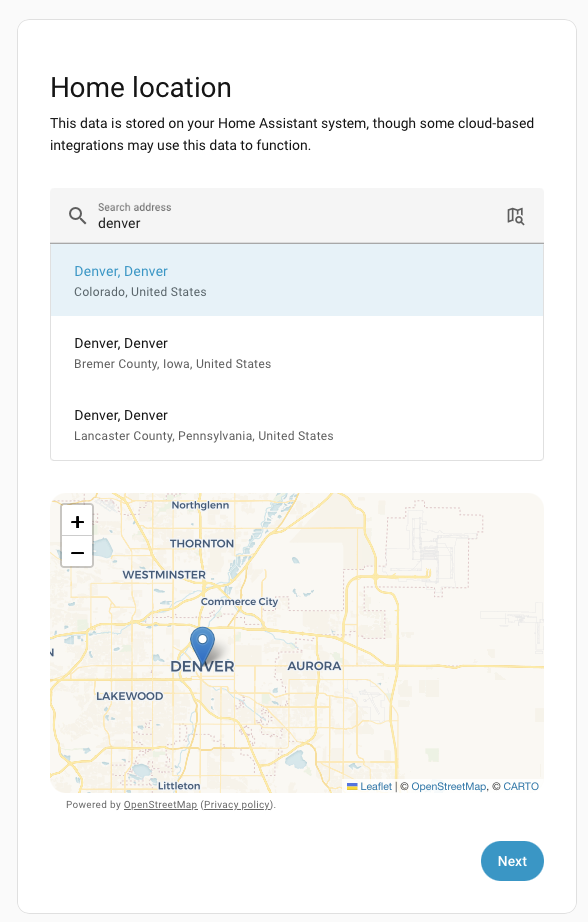
3. Set Your Home Location
Give your home a name, search for your location on the map, and set your timezone, unit system, and currency. Location is used for weather and sunrise/sunset automations.
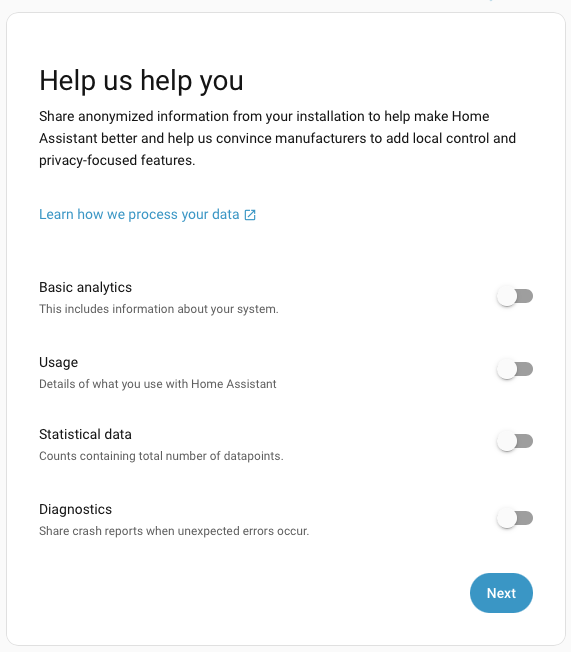
4. Privacy Settings
Choose what anonymous data to share with Home Assistant analytics. All options are optional - you can leave them all off if you prefer.
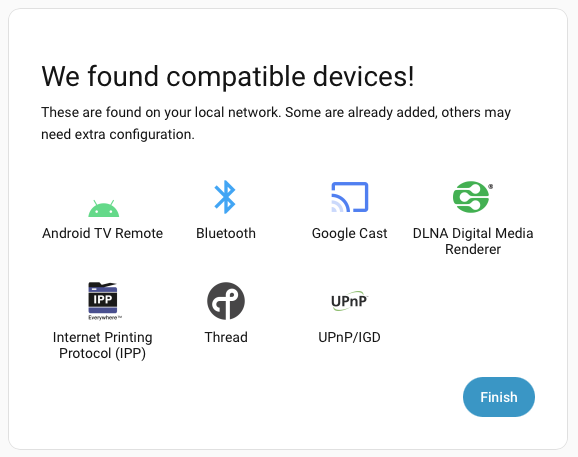
5. Discovered Devices
Home Assistant may find devices on your network. You can skip this for now - we’ll add Exergy integrations later. Click Finish.
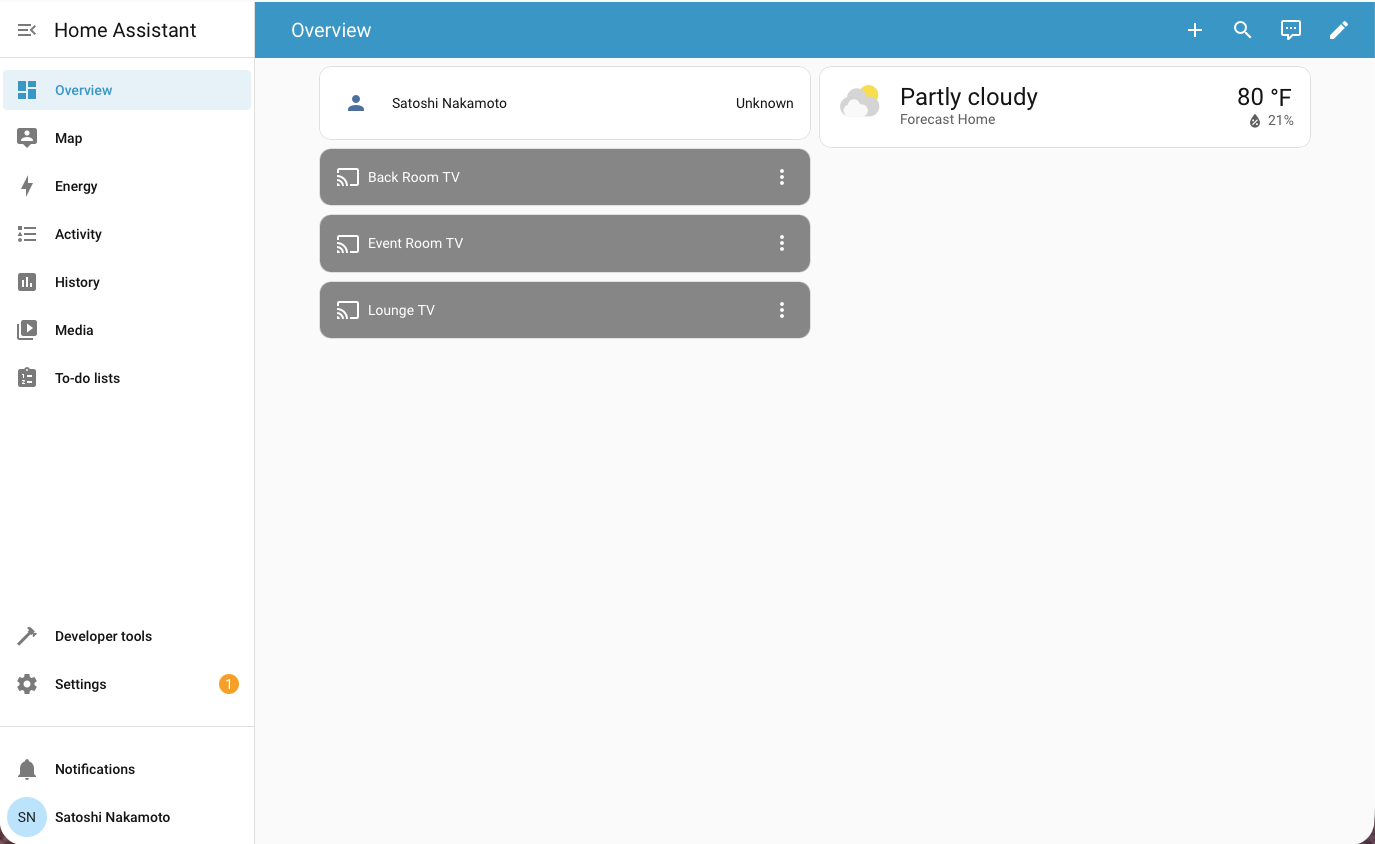
6. You’re In!
You’re now in the Home Assistant dashboard. From here, you can explore the interface before proceeding to install HACS.
Step 5: Install HACS
HACS (Home Assistant Community Store) is required for installing Exergy custom integrations. HACS is not included with Home Assistant by default.
Prerequisites
Before installing HACS:
- Home Assistant version 2024.4.1 or newer (Settings → About to check)
- A GitHub account (free) - Sign up at github.com
- Stable internet connection
Install the Get HACS Add-on
-
Open the add-on repository link
- Click this link from your Home Assistant browser session: Add HACS Repository
- Or manually: Go to Settings → Add-ons → Add-on Store (three dots menu) → Repositories → Add:
https://github.com/hacs/addons
-
Install the Get HACS add-on
- In the Add-on Store, search for Get HACS
- Click on it, then click Install
-
Start the add-on
- After installation, click Start
- Click the Log tab to see the output
- Follow any instructions shown in the log
-
Restart Home Assistant
- Go to Settings → System → Restart
- Click Restart and wait for Home Assistant to come back online
Configure HACS
-
Add the HACS integration
- Go to Settings → Devices & Services
- Click + Add Integration (bottom right)
- Search for HACS and select it
- If HACS doesn’t appear, clear your browser cache and try again
-
Accept the terms
- Read and check all the acknowledgment boxes
- Click Submit
-
Authenticate with GitHub
- You’ll see a device code (e.g.,
ABCD-1234) - Click the link or go to: github.com/login/device
- Sign in to GitHub if needed
- Enter the device code
- Click Authorize HACS
- You’ll see a device code (e.g.,
-
Complete setup
- Back in Home Assistant, the setup will complete automatically
- Assign HACS to an area if desired
- Click Finish
HACS is now installed. You’ll see it in the sidebar menu.
Next Steps
Your Home Assistant is configured and ready for Exergy integrations.
Continue to Exergy HA Integrations to connect your bitcoin miners.
Home Assistant Integrations
Integrations are how Home Assistant connects to your devices. Every smart device in your home - thermostats, lights, security cameras, and now bitcoin miners - uses its own platform or protocol. Integrations bring them all together into one system.
What Are Integrations?
Your smart thermostat has its own app. Your lights have another. Your security system has a third. Each device lives in its own silo with its own interface.
Home Assistant integrations solve this by acting as connectors. Each integration:
- Discovers or connects to a specific device or service
- Creates entities (sensors, switches, controls) you can use in Home Assistant
- Keeps data in sync between the device and Home Assistant
Integrations handle the connection. Once your devices are connected, automations handle the smart logic (when to turn things on, what triggers what), and dashboards provide your control interface.
Official vs Custom Integrations
Official Integrations
Home Assistant includes over 2,000 official integrations out of the box. These are:
- Built into Home Assistant core
- Maintained by Home Assistant team or Meet Home Assistant team criterea for offical integrations
- Configured through Settings → Devices & Services
Common examples: Google Cast, Philips Hue, MQTT, Zigbee (ZHA), weather services.
Custom Integrations (HACS)
HACS (Home Assistant Community Store) extends Home Assistant with community-developed integrations not included in the core.
- Community-built - Developers create integrations for devices not officially supported
- Easy installation - HACS provides a store-like interface for discovery and updates
- Where Exergy integrations currently live - Our bitcoin miner integrations are available through HACS
To use custom integrations, you first install HACS, documented here, then browse and install the integrations you need.
Common Integrations
People add integrations for all their smart devices:
| Category | Examples |
|---|---|
| Climate | Nest, Ecobee, Honeywell thermostats |
| Lighting | Philips Hue, Lutron, LIFX |
| Security | Ring, Arlo, Wyze cameras |
| Media | Sonos, Roku, Apple TV |
| Energy | Sense, Emporia, utility meters |
| Protocols | Zigbee (ZHA), Z-Wave, Matter |
| Weather | OpenWeatherMap, Met.no, NWS |
Browse all official integrations at home-assistant.io/integrations.
Browse all custom HACS integrations on the HACS Github.
Exergy Integrations
We built integrations to bring bitcoin miners into the smart home ecosystem. Connect, control, and monitor your home mining hardware just like any other IoT device.
Miner Integrations
| Integration | Purpose |
|---|---|
| Canaan Avalon Home | Control & monitor Canaan Avalon miners (Mini 3, Q, Nano 3s) |
| Bitaxe | Monitor & control Bitaxe open-source miners |
| StealthMiner / LuxOS | Monitor & control miners with LuxOS firmware |
Pool & Infrastructure Integrations
| Integration | Purpose |
|---|---|
| Ocean Mining Pool | Monitor Ocean pool earnings and statistics |
| Public Pool | Monitor self-hosted Public Pool instances |
| DATUM Gateway | Monitor DATUM Gateway block template proxy |
See a full list of Exergy Integrations here:
Index of Exergy’s Home Assistant Integrations
GitHub
All Exergy integrations are open source:
Contributions welcome—bug reports, feature requests, and code contributions.
Canaan Avalon Home - Exergy Home Assistant Integration
This integration connects Canaan Avalon home miners to Home Assistant, giving you full control and monitoring through the same interface you use for your other smart home devices.
What This Integration Does
Once installed, your miner becomes a controllable device in Home Assistant with:
- Power control - Turn your miner on and off
- Operating modes - Switch between Heating, Mining, and Night modes
- Performance levels - Toggle between Eco and Super
- Real-time monitoring - Temperatures, hashrate, power consumption, fan speeds
- Automation support - Control your miner based on temperature, time, electricity rates, or any trigger
Supported Hardware
| Miner | Hashrate | Heat Output | Best For |
|---|---|---|---|
| Avalon Mini 3 | ~37 TH/s | ~2,900 BTU/hr | Single room heating |
| Avalon Q | ~90 TH/s | ~5,100 BTU/hr | Larger spaces, HVAC integration |
| Avalon Nano 3s | ~6 TH/s | ~500 BTU/hr | Desktop/office warming |
Click each model for detailed specifications, available sensors, and control options.
Installation
Prerequisites
- Home Assistant with HACS installed - HACS is the Home Assistant Community Store where custom integrations are distributed. See our system configuration guide if you need to install it.
- Miner on the same network - Your miner and Home Assistant need to communicate over your local network.
- Miner’s IP address - See Finding Your Miner’s IP Address below.
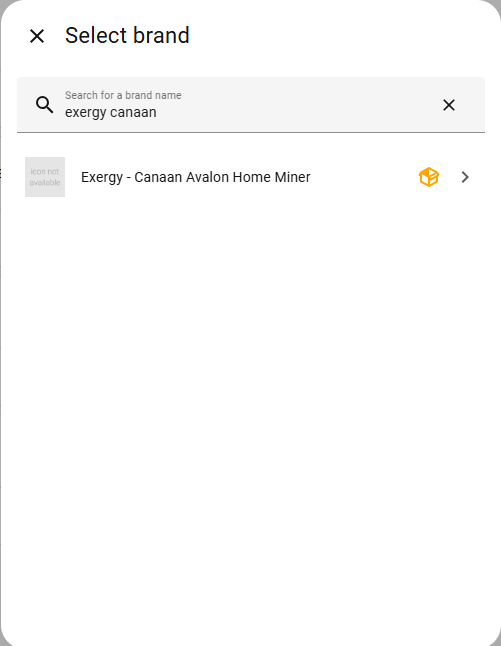
Step 1: Install via HACS
- Open Home Assistant
- Navigate to HACS → Integrations
- Click + Explore & Download Repositories
- Search for “Exergy Canaan”
- Click Download
- Restart Home Assistant
Step 2: Add Your Miner
- Go to Settings → Devices & Services
- Click + Add Integration
- Search for “Exergy Canaan”
- Enter your miner’s IP address and click Submit
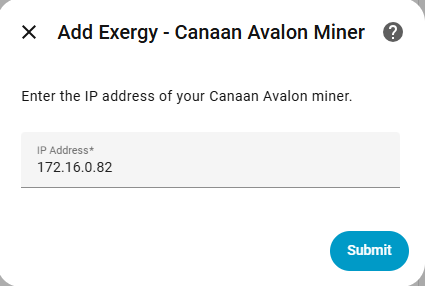
- Configure your miner’s connection settings:
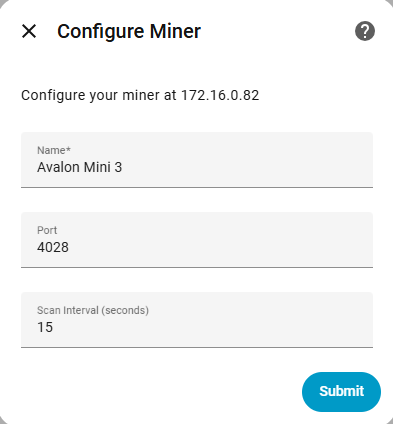
| Setting | Default | Description |
|---|---|---|
| Name | — | How this miner appears in Home Assistant |
| Port | 4028 | CGMiner API port. Leave at default unless you’ve changed it on the miner. |
| Scan Interval | 15 sec | How often Home Assistant polls the miner for updates |
- Give your device a friendly name (like “Upstairs Office Heater”) and optionally assign it to an area.
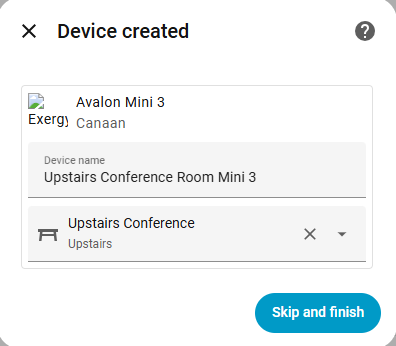
Step 3: Verify
Open the device page to see all available entities:
You should see:
- Controls - Power switch, work mode selector, work level selector
- Sensors - Temperatures, hashrate, power, fan speed, device state
- Buttons - Manual update, reboot
Finding Your Miner’s IP Address
Method 1: Router Admin Panel
- Log into your router’s admin interface
- Look for “Connected Devices” or “DHCP Leases”
- Find the device named “Avalon” or similar
- Note the IP address
Method 2: Avalon Home App
- Open the Avalon Home app
- Connect to your miner
- Find IP address in device settings
Method 3: Network Scanner
Use a network scanning app:
- Fing (iOS/Android)
- Advanced IP Scanner (Windows)
- nmap (Linux/Mac)
Tip: Set a static IP or DHCP reservation for your miner to prevent the address from changing.
Multiple Miners
Add each miner separately through the integration setup. Each appears as its own device with distinct entities. Name them to distinguish locations (e.g., “Office Mini 3” vs “Basement Mini 3”).
What’s Next?
Learn Your Miner’s Capabilities
- Avalon Mini 3 - Sensors, controls, work modes, heating capacity
- Avalon Q - Higher performance unit details
- Avalon Nano 3s - Desktop miner specifics
Set Up Automated Heating
- Space Heater Thermostat Control - Temperature-controlled operation
- HVAC Integration - Whole-home thermostat integration
- Time-of-Use Control - Optimize around electricity rates
Build a Dashboard
- Dashboard Templates - Pre-built monitoring interfaces
Troubleshooting
Integration not finding miner
- Verify miner is powered on and connected to network
- Confirm IP address is correct
- Try accessing miner’s web interface directly (
http://[IP_ADDRESS]) - Check that HA and miner are on the same network/VLAN
Entities showing “Unavailable”
- Ping the miner’s IP to confirm it’s online
- Reload the integration: Settings → Devices & Services → Exergy Canaan → ⋮ → Reload
- Check Home Assistant logs for error messages
Slow updates
- Default scan interval is 15 seconds
- Commands execute within a few seconds
- If persistently slow, check network connectivity
Source Code & Support
- GitHub: github.com/exergyheat/ha-integration-canaan-avalon-home
- Support Forum: support.exergyheat.com/c/sw-support
Canaan Avalon Mini 3 in Home Assistant
The Avalon Mini 3 is a compact bitcoin miner designed for home heating applications, producing ~2,900 BTU/hr at full power.
Before You Start
Two steps before adding this miner to Home Assistant:
-
Set up your miner with the Avalon Home App - Configure WiFi and get your miner’s IP address. Download from Canaan.
-
Install the Exergy Canaan integration - Follow the Canaan Avalon Home Integration guide to install via HACS and add your miner.
Once both are complete, your Mini 3 will appear in Home Assistant with the sensors and controls below.
Specifications
| Spec | Value |
|---|---|
| Hashrate (Super) | ~37 TH/s |
| Hashrate (Eco) | ~28 TH/s |
| Power (Super) | ~850W |
| Power (Eco) | ~450W |
| Heat Output (Super) | ~2,900 BTU/hr |
| Heat Output (Eco) | ~1,536 BTU/hr |
| Noise Level | ~50 dB (Eco mode) |
| Dimensions | 300 x 140 x 195mm |
| Weight | ~5.5 kg |
Work Modes
The Mini 3 supports three operating modes:
Heating Mode
- Optimized for heat output
- Full fan speed for maximum air circulation
- Consistent hashrate
- Turns off at the temperature limit set in the Avalon Home App
Mining Mode
- Optimized for hashrate/efficiency
- Standard operation
- Operates independent of temperature limit
Night Mode
- Reduced noise operation
- Lower fan speeds
- Reduced hashrate and heat output
- Turns off miner display screen
Work Levels
Eco
- Reduced power consumption (~450W)
- Lower heat output (~1,536 BTU/hr)
- Quieter operation
- Lower hashrate (~28 TH/s)
Super
- Maximum performance
- Full power consumption (~850W)
- Maximum heat output (~2,900 BTU/hr)
- Highest hashrate (~37 TH/s)
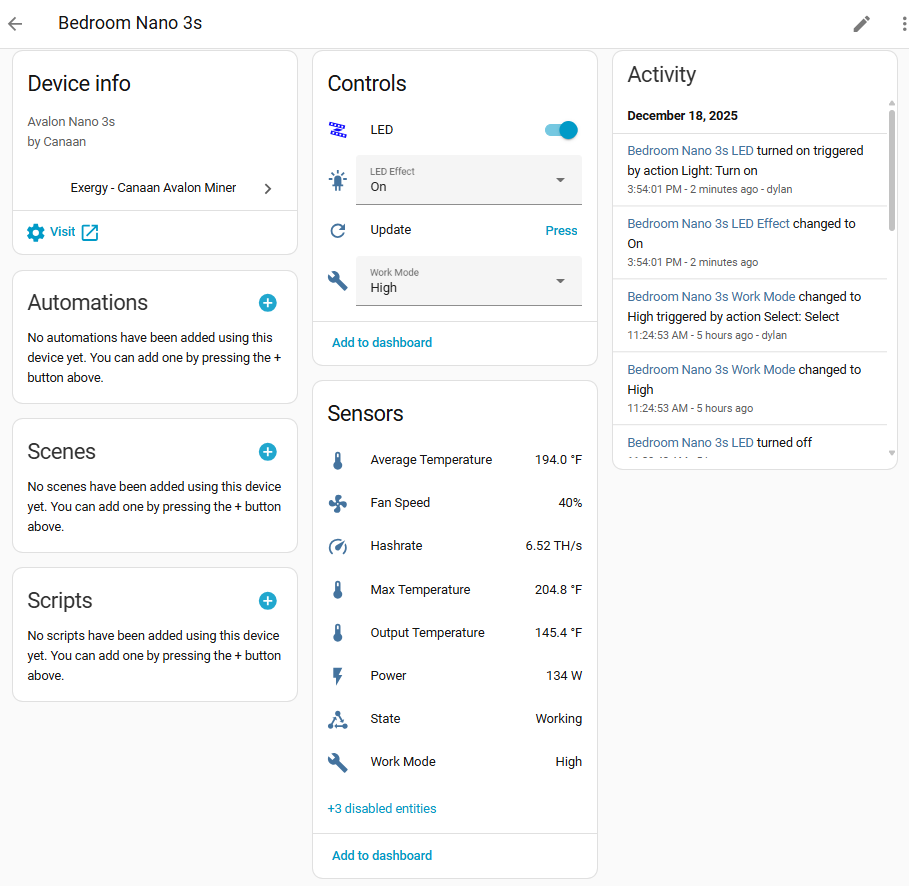
Home Assistant Entities
Sensors
| Sensor | Entity Example | Description |
|---|---|---|
| Ambient Temperature | sensor.avalon_mini_3_ambient_temperature | Intake air temp |
| Output Temperature | sensor.avalon_mini_3_output_temperature | Exhaust air temp |
| Hashboard Temperature | sensor.avalon_mini_3_hash_board_temperature | Internal chip temp |
| Hashrate | sensor.avalon_mini_3_hashrate | Current TH/s |
| Power | sensor.avalon_mini_3_power | Current wattage |
| Fan Speed | sensor.avalon_mini_3_fan_speed | Fan RPM % |
| Device State | sensor.avalon_mini_3_state | Operating status (Idle/Initializing/Working/Fault) |
| Work Level | sensor.avalon_mini_3_work_level | Current level (Super/Eco) |
| Work Mode | sensor.avalon_mini_3_work_mode | Current mode (Mining/Heating/Night) |
| WiFi Signal | sensor.avalon_mini_3_wifi_signal | WiFi signal strength (disabled by default) |
Note: The WiFi Signal sensor is disabled by default. Enable it via Settings > Devices & Services > Exergy Canaan > [device] > Entities and click the disabled entity to enable.
Controls
| Control | Entity Example | Options |
|---|---|---|
| Power | switch.avalon_mini_3_power | On/Off |
| Work Mode | select.avalon_mini_3_work_mode | Heating, Mining, Night |
| Work Level | select.avalon_mini_3_work_level | Eco, Super |
| Update | button.avalon_mini_3_update | Trigger manual sensor update |
| Reboot | button.avalon_mini_3_reboot | Trigger reboot |
Heating Capacity
The Mini 3 produces approximately 2,900 BTU/hr at full power, comparable to a medium-sized space heater.
Suitable for:
- Single room heating (200-400 sq ft)
- Supplemental heating in larger spaces
- Home office or bedroom
Not suitable for:
- Whole-home heating (single unit)
- Spaces requiring silent operation
What’s Next?
Automate Your Heating
- Space Heater Thermostat Control - Temperature-controlled operation
- Time-of-Use Control - Optimize around electricity rates
Build a Dashboard
- Space Heater Dashboard - Thermostat-style interface with mining stats
Canaan Avalon Q in Home Assistant
The Avalon Q is a higher-performance bitcoin miner suitable for larger heating applications, producing ~5,630 BTU/hr at full power.
Before You Start
Two steps before adding this miner to Home Assistant:
-
Set up your miner with the Avalon Home App - Configure WiFi or ethernet and get your miner’s IP address. Download from Canaan.
-
Install the Exergy Canaan integration - Follow the Canaan Avalon Home Integration guide to install via HACS and add your miner.
Once both are complete, your Avalon Q will appear in Home Assistant with the sensors and controls below.
Specifications
| Spec | Value |
|---|---|
| Hashrate | ~90 TH/s (varies by level) |
| Power | ~1,650W |
| Heat Output | ~5,630 BTU/hr |
| Noise Level | ~65 dB |
| Dimensions | 400 x 200 x 290mm |
| Weight | ~12 kg |
Work Levels
The Avalon Q supports three performance levels:
Super
- ~1,700W power consumption
- Maximum heat output
- Full fan speed
- Highest hashrate
Standard
- ~1,300W power consumption
- Balanced performance
- Slightly reduced fan speed
- Medium hashrate
Eco
- ~800W power consumption
- Reduced noise
- Lower fan speeds
- Lower hashrate and heat output
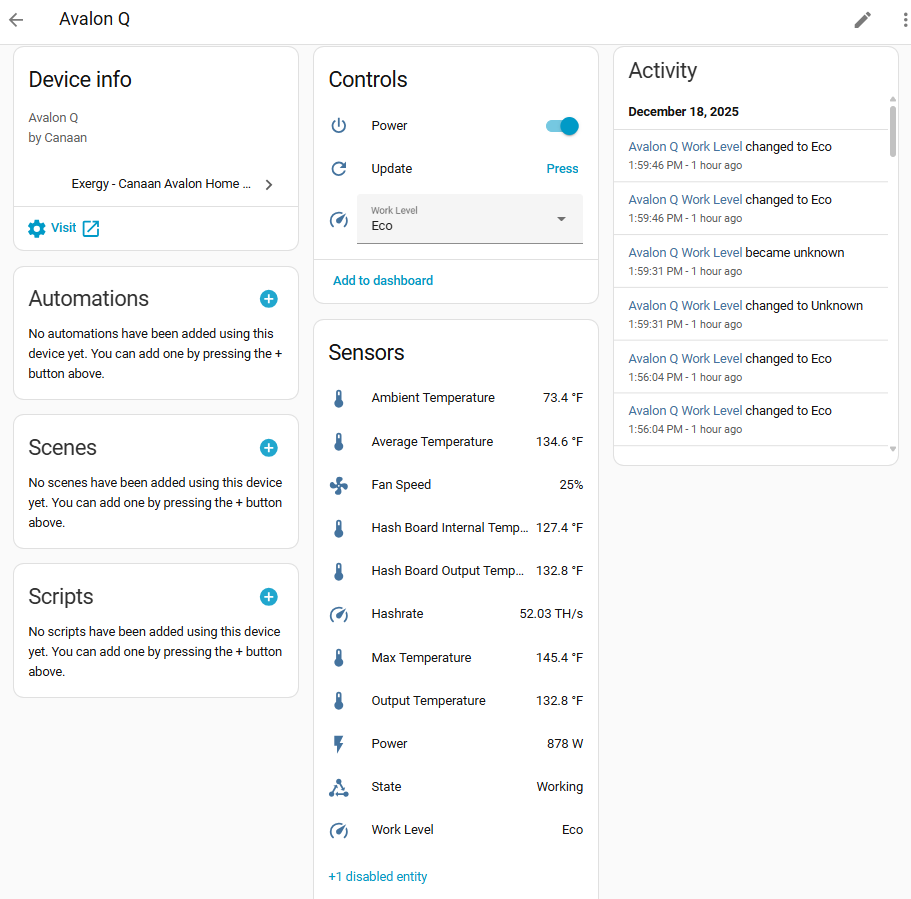
Home Assistant Entities
Sensors
| Sensor | Entity Example | Description |
|---|---|---|
| Ambient Temperature | sensor.avalon_q_ambient_temperature | Intake air temp |
| Output Temperature | sensor.avalon_q_output_temperature | Exhaust air temp |
| Hashboard Temperature | sensor.avalon_q_hash_board_temperature | Internal chip temp |
| Hashrate | sensor.avalon_q_hashrate | Current TH/s |
| Power | sensor.avalon_q_power | Current wattage |
| Fan Speed | sensor.avalon_q_fan_speed | Fan RPM % |
| Device State | sensor.avalon_q_state | Operating status |
| WiFi Signal | sensor.avalon_q_wifi_signal | WiFi signal strength (disabled by default) |
Note: The WiFi Signal sensor is disabled by default. Enable it via Settings > Devices & Services > Exergy Canaan > [device] > Entities and click the disabled entity to enable.
Controls
| Control | Entity Example | Options |
|---|---|---|
| Power | switch.avalon_q_power | On/Off |
| Work Level | select.avalon_q_work_level | Eco, Standard, Super |
| Reboot | button.avalon_q_reboot | Trigger reboot |
Heating Capacity
The Avalon Q produces approximately 5,630 BTU/hr at full power, comparable to a large space heater or small HVAC system.
Suitable for:
- Large room heating (400-800 sq ft)
- Basement or garage heating
- HVAC duct integration
Considerations:
- Requires 15A dedicated circuit
- Higher noise level than Mini 3
- Significant heat output
HVAC Integration
The Avalon Q is well-suited for integration with existing HVAC systems:
- Output can be ducted into supply plenum
- Acts as “Stage 1” heating with fossil fuel as “Stage 2”
- Requires proper airflow management
See HVAC Integrated Thermostat Control for automation setup and HVAC Dashboard for a matching interface.
What’s Next?
Automate Your Heating
- HVAC Integrated Control - Whole-home thermostat integration
- Space Heater Control - Standalone room heating
- Time-of-Use Control - Optimize around electricity rates
Build a Dashboard
- HVAC Dashboard - Thermostat + stage indicators
- Upstairs Example - Real Avalon Q + furnace setup
Canaan Avalon Nano 3s in Home Assistant
The Avalon Nano 3s is a compact, low-power bitcoin miner designed for desktop or small space heating, producing ~500 BTU/hr.
Before You Start
Two steps before adding this miner to Home Assistant:
-
Set up your miner with the Avalon Home App - Configure WiFi and get your miner’s IP address. Download from Canaan.
-
Install the Exergy Canaan integration - Follow the Canaan Avalon Home Integration guide to install via HACS and add your miner.
Once both are complete, your Nano 3s will appear in Home Assistant with the sensors and controls below.
Specifications
| Spec | Value |
|---|---|
| Hashrate | ~6 TH/s (varies by mode) |
| Power | ~150W |
| Heat Output | ~500 BTU/hr |
| Noise Level | ~40 dB |
| Dimensions | 150 x 100 x 100mm |
| Weight | ~1 kg |
Work Modes
The Nano 3s supports three operating modes:
High
- Maximum performance
- Standard fan operation
- Highest heat output
Mid
- Balanced performance
- Standard operation
Low
- Reduced noise
- Lower fan speeds
- Reduced hashrate
Home Assistant Entities
Sensors
| Sensor | Entity Example | Description |
|---|---|---|
| Temperature | sensor.avalon_nano_3s_temperature | Device temperature |
| Hashrate | sensor.avalon_nano_3s_hashrate | Current TH/s |
| Power | sensor.avalon_nano_3s_power | Current wattage |
| Device State | sensor.avalon_nano_3s_state | Operating status |
| WiFi Signal | sensor.avalon_nano_3s_wifi_signal | WiFi signal strength (disabled by default) |
Note: The WiFi Signal sensor is disabled by default. Enable it via Settings > Devices & Services > Exergy Canaan > [device] > Entities and click the disabled entity to enable.
Controls
| Control | Entity Example | Options |
|---|---|---|
| Work Mode | select.avalon_nano_3s_work_mode | High, Medium, Low |
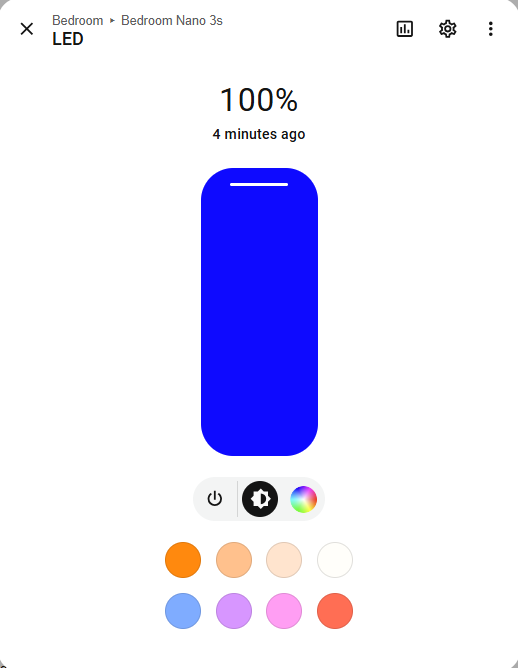
| Light Control | light.avalon_nano_3s_led | LED color selection |
| Light Effects | light.avalon_nano_3s_led_effect | Off, On, Flash, Breath, Loop |
| Reboot | button.avalon_nano_3s_reboot | Trigger reboot |
Note: The Nano 3s API doesn’t support power on/off control. We recommend pairing it with a smart outlet (WiFi or Zigbee) if you need remote power control.
Heating Capacity
The Nano 3s produces approximately 500 BTU/hr, similar to a small personal space heater.
Suitable for:
- Desktop/workspace warming
- Small enclosed spaces
- Supplemental heat source
- Learning/educational setups
Not suitable for:
- Room heating (output too low)
- Primary heating source
Use Cases
Personal Space Heater
- Place under desk or near workspace
- Low noise suitable for office environment
- Warms immediate area
Entry-Level Mining
- Low power requirements (standard outlet)
- Quiet operation
- Learn bitcoin mining basics
Multiple Unit Setups
- Combine several Nano units for distributed heating
- Each unit independently controlled
Electrical Requirements
The Nano 3s has minimal power requirements:
- Standard 120V outlet
- ~1.5A draw
- No dedicated circuit needed
- Can share circuit with other devices
What’s Next?
Add Power Control
The Nano 3s API doesn’t support power on/off. To enable automation, pair with a smart outlet (WiFi or Zigbee) and use the outlet switch in place of a miner power switch in automations.
Automate Your Miner
- Time-of-Use Control - Schedule around electricity rates or noise preferences
Build a Dashboard
- Space Heater Dashboard - Monitor temperature and mining stats
Ocean Mining Pool - Exergy Home Assistant Integration
Monitor your Ocean mining pool earnings and statistics directly in Home Assistant.
Before You Start
Before installing this integration:
-
Home Assistant with HACS installed - This is a custom integration distributed via HACS. See our system configuration guide if you need to set up Home Assistant and HACS.
-
Already mining to Ocean - Your miners must be configured to mine to Ocean pool. The integration pulls data from Ocean’s API based on your wallet address.
-
Your Ocean wallet address - The bitcoin address you configured in your miner’s pool settings.
What is Ocean?
Ocean is a bitcoin mining pool focused on decentralization and transparency. Key features:
- Transparent - Block template selection visible (or build your own with DATUM)
- No KYC - Privacy-respecting
- TIDES payout - Fair reward distribution (similar to PPLNS)
Integration Features
The Exergy Ocean integration provides:
Sensors
| Sensor | Description |
|---|---|
| Mining Account Hashrate (60s) | Current hashrate (60-second average) in TH/s |
| Mining Account Hashrate (300s) | Current hashrate (300-second average) in TH/s |
| Mining Account Shares (60s) | Shares submitted in last 60 seconds |
| Mining Account Shares (300s) | Shares submitted in last 300 seconds |
| Mining Account Shares in Tides | Total shares in TIDES |
| Mining Account Estimated Earnings Next Block | Estimated BTC earnings for next block |
| Mining Account Estimated Bonus Next Block | Estimated bonus BTC for next block |
| Mining Account Estimated Total Earnings Next Block | Total estimated earnings for next block |
| Mining Account Estimated Payout Next Block | Estimated payout for next block |
| Mining Account Unpaid Balance | Unpaid BTC balance |
| Mining Account Unpaid Balance USD | Unpaid balance converted to USD (requires sensor.exchange_rate_1_btc) |
| Mining Account Last Share Timestamp | Timestamp of last submitted share |
| Mining Account Active Workers | Count of currently active workers |
| Mining Account Lifetime Earnings | Total lifetime BTC earnings (scraped from website) |
Worker Specific Sensors
Workers are automatically discovered - if you have 3 workers, you’ll get sensors and binary sensors for each. Each worker appears as its own device under the main mining account device. For each worker detected, the following entities are created dynamically:
| Sensor | Description |
|---|---|
| {worker_name} Hashrate (60s) | Worker’s hashrate (60-second average) in TH/s |
| {worker_name} Hashrate (300s) | Worker’s hashrate (300-second average) in TH/s |
| {worker_name} Last Share | Timestamp of worker’s last submitted share |
| {worker_name} Estimated Earnings Next Block | Worker’s estimated BTC earnings for next block |
| {worker_name} Lifetime Earnings | Worker’s total lifetime BTC earnings (scraped from website) |
Worker Binary Sensors
| Binary Sensor | Description |
|---|---|
| {worker_name} Online | Worker online/offline status (on = connected, off = disconnected) |
Note: Entity IDs are automatically generated based on your wallet address. Find your actual entity IDs at Settings > Devices & Services > Exergy Ocean > [your device].
Installation
Step 1: Install via HACS
- Open Home Assistant
- Navigate to HACS → Integrations
- Click + Explore & Download Repositories
- Search for “Exergy Ocean”
- Click Download
- Restart Home Assistant
Step 2: Add Integration
- Go to Settings → Devices & Services
- Click + Add Integration
- Search for “Exergy Ocean”
- Enter your Ocean wallet address
- Click Submit
Step 3: Verify
The integration creates sensors for your mining statistics. Check the device page to see all available entities.
Dashboard Integration
Display your mining earnings alongside miner status:
type: entities
title: Mining Stats
entities:
  # Entity IDs vary based on your wallet address
  # Find yours at Settings → Devices & Services → Exergy Ocean
  - entity: sensor.ocean_mining_account_hashrate_60s
    name: My Hashrate
  - entity: sensor.ocean_mining_account_estimated_earnings_next_block
    name: Est. Earnings
  - entity: sensor.ocean_mining_account_unpaid_balance
    name: Unpaid Balance
Automation Ideas
Low Hashrate Alert
Notify when your pool hashrate drops (indicates miner issues):
automation:
  - alias: "Low hashrate alert"
    trigger:
      - platform: numeric_state
        entity_id: sensor.ocean_hashrate_24h
        below: 30  # TH/s threshold
        for:
          hours: 2
    action:
      - service: notify.mobile_app
        data:
          message: "Mining hashrate dropped below threshold"
Daily Earnings Summary
Send a daily summary of mining earnings:
automation:
  - alias: "Daily mining summary"
    trigger:
      - platform: time
        at: "20:00:00"
    action:
      - service: notify.mobile_app
        data:
          message: >
            Today's mining: ~{{ states('sensor.ocean_estimated_daily') }} sats
            Unpaid: {{ states('sensor.ocean_unpaid_balance') }} sats
Finding Your Ocean Wallet Address
Your Ocean wallet address is the bitcoin address you configured when setting up your miner to point to Ocean:
- This is the address in your miner’s pool configuration
- It’s also visible at
ocean.xyz/[your-address]
Troubleshooting
No data appearing
- Verify wallet address is correct
- Ensure miners are actively mining to Ocean
- Wait for data to populate (can take a few hours for new setups)
- Check Ocean website directly to verify mining activity
Hashrate discrepancy
- Pool-reported hashrate is averaged over time
- Local miner hashrate is real-time
- Some variation is normal
- Significant differences may indicate connectivity issues
What’s Next?
Connect Your Miners
To mine to Ocean, you need miners connected to Home Assistant:
- Canaan Avalon Home Integration - Connect Avalon miners
- Bitaxe Integration - Connect Bitaxe miners
- StealthMiner / LuxOS Integration - Connect LuxOS miners
Use DATUM Gateway
Build your own block templates while mining to Ocean:
- DATUM Gateway Integration - Monitor your DATUM Gateway
Build a Dashboard
Ocean sensors work great alongside miner stats:
- Dashboard Templates - Pre-built monitoring interfaces
Source Code & Support
- GitHub: github.com/exergyheat/ha-integration-ocean-pool
- Support Forum: support.exergyheat.com
Resources
DATUM Gateway - Exergy Home Assistant Integration
Monitor your DATUM Gateway bitcoin mining proxy directly in Home Assistant. Track hashrate, shares, pool status, and block template information.
Before You Start
Before installing this integration:
-
Home Assistant 2023.1.0 or newer - This integration requires HA 2023.1.0+.
-
HACS installed - This is a custom integration distributed via HACS. See our system configuration guide if you need to set up HACS.
-
DATUM Gateway running - You need a DATUM Gateway instance running v0.4.0 or higher.
-
Gateway URL - The URL where your DATUM Gateway is accessible.
What is DATUM Gateway?
DATUM Gateway is self-hosted mining proxy software that enables miners to construct their own block templates while still mining to a pool. Key features:
- Block template construction - Build your own templates instead of relying solely on pool-provided ones
- Decentralization - Reduces pool control over transaction selection
- Transparency - Full visibility into block template details
- Ocean integration - Works seamlessly with Ocean mining pool
DATUM stands for “Decentralized Alternative Templates for Universal Mining.”
Integration Features
The Exergy DATUM Gateway integration provides monitoring of your gateway operations:
Sensors
| Sensor | Entity Example | Description |
|---|---|---|
| Combined Hashrate | sensor.datum_gateway_hashrate | Total hashrate from all connected miners |
| Thread Count | sensor.datum_gateway_thread_count | Number of active mining threads |
| Shares Accepted | sensor.datum_gateway_shares_accepted | Total accepted shares |
| Shares Rejected | sensor.datum_gateway_shares_rejected | Total rejected shares |
| Acceptance Rate | sensor.datum_gateway_acceptance_rate | Share acceptance percentage |
| Pool Status | sensor.datum_gateway_pool_status | Connection status to mining pool |
| Block Height | sensor.datum_gateway_block_height | Current block template height |
| Block Reward | sensor.datum_gateway_block_reward | Current block reward (BTC) |
| Transaction Count | sensor.datum_gateway_tx_count | Transactions in current block template |
| Uptime | sensor.datum_gateway_uptime | Gateway process uptime |
| Pool Endpoint | sensor.datum_gateway_pool_endpoint | Connected pool URL |
| Miner Tag | sensor.datum_gateway_miner_tag | Configured miner tag |
Per-Thread Sensors
For each connected mining thread, additional sensors are created:
| Sensor | Entity Example | Description |
|---|---|---|
| Thread Hashrate | sensor.datum_gateway_thread_X_hashrate | Individual thread hashrate |
| Thread Shares | sensor.datum_gateway_thread_X_shares | Thread share count |
Note: Entity IDs are generated based on your gateway configuration. Find actual IDs at Settings > Devices & Services > DATUM Gateway > [your device].
Installation
Step 1: Install via HACS
- Open Home Assistant
- Navigate to HACS > Integrations
- Click + Explore & Download Repositories
- Search for “DATUM Gateway” or “Exergy DATUM”
- Click Download
- Restart Home Assistant
Step 2: Add Integration
- Go to Settings > Devices & Services
- Click + Add Integration
- Search for “DATUM Gateway”
- Enter your configuration:
| Setting | Default | Description |
|---|---|---|
| Gateway URL | — | Full URL to your DATUM Gateway |
| SSL Verification | On | Toggle SSL certificate verification |
- Click Submit
Step 3: Verify
The integration creates sensors for your gateway statistics. Check the device page to see all available entities.
Configuration
Gateway URL
The URL must include the protocol and port:
- Local:
http://192.168.1.100:7152 - Remote with SSL:
https://datum.example.com:7152 - Docker:
http://datum-gateway:7152
SSL Verification
Disable SSL verification only if using self-signed certificates. For production deployments, use valid certificates.
Dashboard Integration
Display your DATUM Gateway stats:
type: vertical-stack
cards:
  - type: entities
    title: DATUM Gateway Status
    entities:
      - entity: sensor.datum_gateway_hashrate
        name: Gateway Hashrate
      - entity: sensor.datum_gateway_pool_status
        name: Pool Status
      - entity: sensor.datum_gateway_acceptance_rate
        name: Acceptance Rate
      - entity: sensor.datum_gateway_thread_count
        name: Active Threads

  - type: entities
    title: Block Template
    entities:
      - entity: sensor.datum_gateway_block_height
        name: Block Height
      - entity: sensor.datum_gateway_block_reward
        name: Block Reward
      - entity: sensor.datum_gateway_tx_count
        name: Transactions
Automation Ideas
Block Height Change Notification
automation:
  - alias: "New block notification"
    trigger:
      - platform: state
        entity_id: sensor.datum_gateway_block_height
    action:
      - service: notify.mobile_app
        data:
          message: "New block! Height: {{ states('sensor.datum_gateway_block_height') }}"
Pool Disconnect Alert
automation:
  - alias: "DATUM pool disconnect alert"
    trigger:
      - platform: state
        entity_id: sensor.datum_gateway_pool_status
        to: "disconnected"
        for:
          minutes: 5
    action:
      - service: notify.mobile_app
        data:
          message: "DATUM Gateway lost pool connection"
Low Acceptance Rate Alert
automation:
  - alias: "DATUM low acceptance rate"
    trigger:
      - platform: numeric_state
        entity_id: sensor.datum_gateway_acceptance_rate
        below: 95
        for:
          minutes: 10
    action:
      - service: notify.mobile_app
        data:
          message: "DATUM acceptance rate below 95%: {{ states('sensor.datum_gateway_acceptance_rate') }}%"
Hashrate Drop Alert
automation:
  - alias: "DATUM hashrate drop"
    trigger:
      - platform: numeric_state
        entity_id: sensor.datum_gateway_hashrate
        below: 50
        for:
          minutes: 15
    action:
      - service: notify.mobile_app
        data:
          message: "DATUM Gateway hashrate dropped below 50 TH/s"
Troubleshooting
No data appearing
- Verify Gateway URL is correct and accessible
- Ensure DATUM Gateway is running v0.4.0 or higher
- Check Home Assistant logs for connection errors
- Try accessing the gateway status page directly in a browser
SSL Errors
- Verify the SSL certificate is valid
- Try disabling SSL verification temporarily to diagnose
- Ensure the URL protocol matches your setup (http vs https)
Dependency Issues
This integration requires BeautifulSoup4. If you encounter import errors:
- Check Home Assistant logs for specific error messages
- Restart Home Assistant to trigger dependency installation
Stale Data
- Check gateway is actively receiving work from miners
- Verify pool connection is healthy
- Reload the integration to force a refresh
What’s Next?
Connect Your Miners
- Canaan Avalon Integration - Connect Avalon miners
- Bitaxe Integration - Connect Bitaxe miners
- StealthMiner/LuxOS Integration - Connect LuxOS miners
Monitor Pool Stats
- Ocean Pool Integration - Monitor Ocean pool earnings
Build a Dashboard
- Dashboard Templates - Pre-built monitoring interfaces
Resources
Source Code & Support
- GitHub: github.com/exergyheat/ha-integration-datum-gateway
- Support Forum: support.exergyheat.com
Public Pool - Exergy Home Assistant Integration
Monitor your self-hosted Public Pool instance directly in Home Assistant. Compatible with Start9 and other self-hosted deployments.
Before You Start
Before installing this integration:
-
Home Assistant with HACS installed - This is a custom integration distributed via HACS. See our system configuration guide if you need to set up Home Assistant and HACS.
-
Self-hosted Public Pool running - You need a Public Pool instance running (self-hosted or Start9).
-
Pool URL - The URL where your Public Pool instance is accessible.
-
Your Bitcoin address - The address you’re mining to (for address-level stats).
What is Public Pool?
Public Pool is open-source mining pool software designed for self-hosting. Key features:
- Self-sovereign - Run your own pool infrastructure
- Start9 compatible - Easy deployment on Start9 servers
- Privacy-focused - Your data stays on your infrastructure
- Solo mining - Mine blocks directly to your wallet
- No fees - You control everything
Integration Features
The Exergy Public Pool integration provides multi-level monitoring:
Pool-Level Sensors
| Sensor | Entity Example | Description |
|---|---|---|
| Pool Hashrate | sensor.public_pool_hashrate | Total pool hashrate in TH/s |
| Miner Count | sensor.public_pool_miner_count | Number of connected miners |
| Block Height | sensor.public_pool_block_height | Current block being worked on |
Network-Level Sensors
| Sensor | Entity Example | Description |
|---|---|---|
| Network Difficulty | sensor.public_pool_network_difficulty | Current bitcoin network difficulty |
| Network Hashrate | sensor.public_pool_network_hashrate | Network hashrate in EH/s |
| Blockchain Height | sensor.public_pool_blockchain_height | Current blockchain height |
Address-Level Sensors
Sensors for your specific mining address:
| Sensor | Entity Example | Description |
|---|---|---|
| Best Difficulty | sensor.public_pool_address_best_difficulty | Best difficulty share found |
| Worker Count | sensor.public_pool_address_worker_count | Number of workers for this address |
| Address Hashrate | sensor.public_pool_address_hashrate | Your address hashrate in GH/s |
Per-Worker Sensors
For each worker detected, these sensors are created dynamically:
| Sensor | Entity Example | Description |
|---|---|---|
| Worker Hashrate | sensor.public_pool_worker_{name}_hashrate | Worker hashrate in GH/s |
| Worker Best Difficulty | sensor.public_pool_worker_{name}_best_difficulty | Worker’s best difficulty share |
| Worker Last Activity | sensor.public_pool_worker_{name}_last_activity | Timestamp of last activity |
Note: Entity IDs are automatically generated. Find your actual entity IDs at Settings > Devices & Services > Public Pool > [your device].
Installation
Step 1: Install via HACS
- Open Home Assistant
- Navigate to HACS > Integrations
- Click + Explore & Download Repositories
- Search for “Public Pool” or “Exergy Public Pool”
- Click Download
- Restart Home Assistant
Step 2: Add Integration
- Go to Settings > Devices & Services
- Click + Add Integration
- Search for “Public Pool”
- Enter your configuration:
| Setting | Default | Description |
|---|---|---|
| Pool URL | — | URL to your Public Pool instance |
| Bitcoin Address | — | Your mining address for address-level stats |
| Scan Interval | 60 sec | How often to poll for updates |
| SSL Verification | On | Toggle SSL certificate verification |
- Click Submit
Step 3: Verify
The integration creates sensors at pool, network, address, and worker levels. Check the device page to see all available entities.
Configuration
Pool URL Examples
- Local Start9:
http://public-pool.embassy:3334 - Local network:
http://192.168.1.100:3334 - Remote with SSL:
https://pool.example.com - Tor (Start9): Use local embassy address for better performance
Bitcoin Address
Enter the address your miners are configured to mine to. This enables:
- Address-specific hashrate tracking
- Best difficulty monitoring
- Per-worker statistics
Scan Interval
Default is 60 seconds. Range: 30-300 seconds.
- Lower intervals = more responsive but more API load
- Higher intervals = less load but delayed updates
Start9 Integration
If running Public Pool on Start9:
- Find your pool’s local address in Start9’s interface
- Use the local embassy address:
http://public-pool.embassy:3334 - This avoids Tor latency for local access
- For remote access, configure Tor proxy settings
Dashboard Integration
Display your Public Pool stats:
type: vertical-stack
cards:
  - type: entities
    title: My Public Pool
    entities:
      - entity: sensor.public_pool_hashrate
        name: Pool Hashrate
      - entity: sensor.public_pool_miner_count
        name: Connected Miners
      - entity: sensor.public_pool_address_hashrate
        name: My Hashrate
      - entity: sensor.public_pool_address_best_difficulty
        name: Best Difficulty

  - type: entities
    title: Network Stats
    entities:
      - entity: sensor.public_pool_network_difficulty
        name: Network Difficulty
      - entity: sensor.public_pool_network_hashrate
        name: Network Hashrate
      - entity: sensor.public_pool_blockchain_height
        name: Block Height
Automation Ideas
Worker Offline Alert
automation:
  - alias: "Public Pool worker offline"
    trigger:
      - platform: template
        value_template: >
          {{ (now() - states.sensor.public_pool_worker_miner1_last_activity.last_changed).total_seconds() > 600 }}
    action:
      - service: notify.mobile_app
        data:
          message: "Worker miner1 appears offline - no activity for 10 minutes"
New Best Difficulty Celebration
automation:
  - alias: "New best difficulty found"
    trigger:
      - platform: state
        entity_id: sensor.public_pool_address_best_difficulty
    condition:
      - condition: template
        value_template: "{{ trigger.to_state.state | float > trigger.from_state.state | float }}"
    action:
      - service: notify.mobile_app
        data:
          message: "New best difficulty: {{ states('sensor.public_pool_address_best_difficulty') }}!"
Low Hashrate Alert
automation:
  - alias: "Public Pool low hashrate"
    trigger:
      - platform: numeric_state
        entity_id: sensor.public_pool_address_hashrate
        below: 100
        for:
          minutes: 30
    action:
      - service: notify.mobile_app
        data:
          message: "Public Pool hashrate dropped below 100 GH/s"
Daily Mining Summary
automation:
  - alias: "Daily Public Pool summary"
    trigger:
      - platform: time
        at: "20:00:00"
    action:
      - service: notify.mobile_app
        data:
          message: >
            Public Pool Stats:
            Hashrate: {{ states('sensor.public_pool_address_hashrate') }} GH/s
            Best Diff: {{ states('sensor.public_pool_address_best_difficulty') }}
            Workers: {{ states('sensor.public_pool_address_worker_count') }}
Solo Mining Considerations
Public Pool is designed for solo mining:
- Variance is high - You may go long periods without finding a block
- Best difficulty matters - Track your progress toward a block
- Patience required - Small hashrate means low probability per block
Probability Calculations
Your chance of finding a block depends on:
- Your hashrate vs network hashrate
- Current network difficulty
- Time
At 1 TH/s against ~600 EH/s network, expect very long times between blocks. Public Pool is best suited for users who:
- Value sovereignty over consistent payouts
- Have significant hashrate
- Want to learn about mining without third-party pools
Troubleshooting
No data appearing
- Verify Pool URL is correct and accessible
- Check that your bitcoin address is actively mining
- Wait for workers to appear (they show after mining activity)
- Check Home Assistant logs for API errors
Workers not showing
- Workers appear dynamically based on mining activity
- Inactive workers may not appear immediately
- Verify workers are configured with the correct bitcoin address
- Check miner is actually submitting work
SSL/Certificate errors
- Start9 uses self-signed certificates by default
- Disable SSL verification if using self-signed certs
- Use local embassy address to avoid certificate issues
Stale data
- Check pool is receiving work from miners
- Verify scan interval isn’t too long
- Reload the integration to force refresh
What’s Next?
Connect Your Miners
- Bitaxe Integration - For Bitaxe miners
- Canaan Avalon Integration - For Avalon home miners
- StealthMiner/LuxOS Integration - For LuxOS firmware miners
Build a Dashboard
- Dashboard Templates - Pre-built monitoring interfaces
Resources
Source Code & Support
- GitHub: github.com/exergyheat/ha-integration-public-pool
- Support Forum: support.exergyheat.com
Bitaxe - Exergy Home Assistant Integration
Monitor AND control your Bitaxe mining devices directly in Home Assistant. Full local control with no cloud dependency.
Before You Start
Before installing this integration:
-
Home Assistant 2024.1.0 or newer - This integration requires HA 2024.1.0+.
-
HACS installed - This is a custom integration distributed via HACS. See our system configuration guide if you need to set up HACS.
-
Bitaxe running ESP-Miner firmware - Your device must be running compatible ESP-Miner firmware.
-
Bitaxe IP address - The local IP where your Bitaxe is accessible.
What is Bitaxe?
Bitaxe is an open-source, ASIC-based bitcoin miner designed for home use. Key features:
- Open hardware - Fully open-source hardware design
- Compact - Small form factor for desktop/home use
- Local-only - No cloud services required
- Customizable - Adjustable frequency, voltage, and fan settings
Integration Features
The Exergy Bitaxe integration provides comprehensive monitoring AND control:
Sensors
| Sensor | Entity Example | Description |
|---|---|---|
| Hashrate | sensor.bitaxe_hashrate | Current hashrate |
| Hashrate (1 min avg) | sensor.bitaxe_hashrate_1m | 1-minute average hashrate |
| Hashrate (5 min avg) | sensor.bitaxe_hashrate_5m | 5-minute average hashrate |
| Hashrate (1 hr avg) | sensor.bitaxe_hashrate_1h | 1-hour average hashrate |
| Hashrate (24 hr avg) | sensor.bitaxe_hashrate_24h | 24-hour average hashrate |
| Shares Accepted | sensor.bitaxe_shares_accepted | Total accepted shares |
| Shares Rejected | sensor.bitaxe_shares_rejected | Total rejected shares |
| Error Rate | sensor.bitaxe_error_rate | Share error rate percentage |
| Chip Temperature | sensor.bitaxe_chip_temperature | ASIC chip temperature |
| VR Temperature | sensor.bitaxe_vr_temperature | Voltage regulator temperature |
| Input Voltage | sensor.bitaxe_input_voltage | Input voltage |
| Core Voltage | sensor.bitaxe_core_voltage | ASIC core voltage (mV) |
| Power | sensor.bitaxe_power | Power consumption (W) |
| Fan Speed | sensor.bitaxe_fan_speed | Fan speed percentage |
| Uptime | sensor.bitaxe_uptime | Device uptime |
Switches
| Switch | Entity Example | Description |
|---|---|---|
| Auto Fan Speed | switch.bitaxe_auto_fan | Toggle automatic fan speed control |
| Overclock Enabled | switch.bitaxe_overclock | Toggle overclocking mode |
| Invert Screen | switch.bitaxe_invert_screen | Invert display colors |
Number Controls
| Control | Entity Example | Range | Description |
|---|---|---|---|
| Core Voltage | number.bitaxe_core_voltage | 1000-1400 mV | ASIC core voltage |
| Frequency | number.bitaxe_frequency | 100-1000 MHz | ASIC clock frequency |
| Fan Speed | number.bitaxe_fan_speed | 0-100% | Manual fan speed (when auto off) |
| Temp Target | number.bitaxe_temp_target | 30-100 C | Target temperature for auto fan |
| Display Timeout | number.bitaxe_display_timeout | -1 to 240 min | Screen timeout duration |
| Stats Frequency | number.bitaxe_stats_frequency | 0-600 sec | Stats update frequency |
Select Controls
| Control | Entity Example | Options | Description |
|---|---|---|---|
| Screen Rotation | select.bitaxe_screen_rotation | 0, 90, 180, 270 | Display rotation angle |
Buttons
| Button | Entity Example | Description |
|---|---|---|
| Update Firmware | button.bitaxe_update | Trigger OTA firmware update |
| Restart | button.bitaxe_restart | Restart the device |
| Identify | button.bitaxe_identify | Flash screen/LED to identify device |
Note: Entity IDs are generated based on your device name. Find actual IDs at Settings > Devices & Services > Bitaxe > [your device].
Installation
Step 1: Install via HACS
- Open Home Assistant
- Navigate to HACS > Integrations
- Click + Explore & Download Repositories
- Search for “Exergy Bitaxe”
- Click Download
- Restart Home Assistant
Step 2: Add Your Bitaxe
- Go to Settings > Devices & Services
- Click + Add Integration
- Search for “Bitaxe”
- Enter your configuration:
| Setting | Default | Description |
|---|---|---|
| IP Address | — | Your Bitaxe’s local IP address |
| Port | 80 | HTTP port (usually 80) |
| Scan Interval | 15 sec | How often to poll for updates (5-300 sec) |
- Click Submit
Step 3: Verify
The integration creates a device with all sensors and controls. Check the device page to see all available entities.
Finding Your Bitaxe IP Address
Method 1: Router Admin Panel
- Log into your router’s admin interface
- Look for “Connected Devices” or “DHCP Leases”
- Find the device named “Bitaxe” or similar
- Note the IP address
Method 2: Bitaxe Web Interface
If you’ve previously accessed your Bitaxe, check your browser history for the IP.
Method 3: Network Scanner
Use a network scanning app:
- Fing (iOS/Android)
- Advanced IP Scanner (Windows)
- nmap (Linux/Mac)
Tip: Set a static IP or DHCP reservation for your Bitaxe to prevent the address from changing.
Dashboard Integration
Create a comprehensive Bitaxe control panel:
type: vertical-stack
cards:
  - type: entities
    title: Bitaxe Status
    entities:
      - entity: sensor.bitaxe_hashrate
        name: Hashrate
      - entity: sensor.bitaxe_chip_temperature
        name: Chip Temperature
      - entity: sensor.bitaxe_power
        name: Power
      - entity: sensor.bitaxe_shares_accepted
        name: Accepted Shares
      - entity: sensor.bitaxe_error_rate
        name: Error Rate

  - type: entities
    title: Bitaxe Controls
    entities:
      - entity: switch.bitaxe_auto_fan
        name: Auto Fan
      - entity: number.bitaxe_fan_speed
        name: Fan Speed
      - entity: number.bitaxe_frequency
        name: Frequency
      - entity: number.bitaxe_core_voltage
        name: Core Voltage
Automation Ideas
Temperature Protection
automation:
  - alias: "Bitaxe overheat protection"
    trigger:
      - platform: numeric_state
        entity_id: sensor.bitaxe_chip_temperature
        above: 75
    action:
      - service: number.set_value
        target:
          entity_id: number.bitaxe_frequency
        data:
          value: 400
      - service: notify.mobile_app
        data:
          message: "Bitaxe temperature high - reduced frequency"
Scheduled Performance Mode
automation:
  - alias: "Bitaxe night performance mode"
    trigger:
      - platform: time
        at: "23:00:00"
    action:
      - service: number.set_value
        target:
          entity_id: number.bitaxe_frequency
        data:
          value: 575

  - alias: "Bitaxe day efficiency mode"
    trigger:
      - platform: time
        at: "07:00:00"
    action:
      - service: number.set_value
        target:
          entity_id: number.bitaxe_frequency
        data:
          value: 450
Low Hashrate Alert
automation:
  - alias: "Bitaxe low hashrate alert"
    trigger:
      - platform: numeric_state
        entity_id: sensor.bitaxe_hashrate_1h
        below: 400
        for:
          minutes: 30
    action:
      - service: notify.mobile_app
        data:
          message: "Bitaxe hashrate dropped below 400 GH/s"
Tuning Your Bitaxe
The integration gives you full control over performance parameters:
Frequency vs Efficiency
| Frequency | Typical Hashrate | Power | Notes |
|---|---|---|---|
| 400 MHz | ~400 GH/s | Low | Most efficient |
| 500 MHz | ~500 GH/s | Medium | Balanced |
| 575 MHz | ~575 GH/s | Higher | Performance |
Voltage Guidelines
- Start at stock voltage
- Increase in small increments (25mV) if unstable at higher frequencies
- Monitor error rate - keep below 1-2%
Temperature Management
- Auto fan mode maintains target temperature
- Lower target = more noise, better stability
- Recommended: 55-65C target
Troubleshooting
Integration not finding Bitaxe
- Verify Bitaxe is powered and connected to network
- Confirm IP address is correct
- Try accessing Bitaxe web interface directly (
http://[IP_ADDRESS]) - Check that port 80 is not blocked
Controls not responding
- Some controls require firmware support
- Check you’re running compatible ESP-Miner firmware
- Reload the integration after firmware updates
High error rate
- Reduce frequency in small steps
- Increase core voltage slightly
- Improve cooling
- Check power supply stability
Entities showing “Unavailable”
- Ping the device to confirm it’s online
- Reload the integration: Settings > Devices & Services > Bitaxe > ⋮ > Reload
- Check Home Assistant logs for specific errors
What’s Next?
Monitor Pool Stats
- Public Pool Integration - For self-hosted pools
- Ocean Pool Integration - For Ocean pool stats
Build a Dashboard
- Dashboard Templates - Pre-built monitoring interfaces
Set Up Automations
- Time-of-Use Control - Optimize around electricity rates
Source Code & Support
- GitHub: github.com/exergyheat/ha-integration-bitaxe
- Support Forum: support.exergyheat.com
StealthMiner / LuxOS - Exergy Home Assistant Integration
Monitor and control miners running LuxOS firmware directly in Home Assistant. Full control over power, profiles, and mining operations.
Before You Start
Before installing this integration:
-
Home Assistant 2024.1.0 or newer - This integration requires HA 2024.1.0+.
-
HACS installed - This is a custom integration distributed via HACS. See our system configuration guide if you need to set up HACS.
-
Miner running LuxOS firmware - Your miner must be flashed with LuxOS firmware.
-
Miner IP address and port 4028 accessible - LuxOS API runs on port 4028.
What is LuxOS?
LuxOS is alternative firmware for bitcoin miners that provides:
- Enhanced control - Granular power and performance settings
- ATM (Auto-Tune Mode) - Automatic optimization for best performance
- Multiple profiles - Switch between preset configurations
- API access - Full control via HTTP API on port 4028
Supported Hardware
LuxOS firmware runs on various miner models including Antminer S19 series and other compatible hardware. Check LuxOS compatibility documentation for your specific model.
Integration Features
The Exergy StealthMiner/LuxOS integration provides comprehensive monitoring and control:
Sensors
| Sensor | Entity Example | Description |
|---|---|---|
| Hashrate (5s) | sensor.stealthminer_hashrate_5s | 5-second hashrate average |
| Hashrate (1m) | sensor.stealthminer_hashrate_1m | 1-minute hashrate average |
| Hashrate (15m) | sensor.stealthminer_hashrate_15m | 15-minute hashrate average |
| Hashrate (30m) | sensor.stealthminer_hashrate_30m | 30-minute hashrate average |
| Hashrate (avg) | sensor.stealthminer_hashrate_avg | Overall average hashrate |
| Power | sensor.stealthminer_power | Current power consumption (W) |
| Efficiency | sensor.stealthminer_efficiency | Efficiency in W/TH |
| Board Temperature | sensor.stealthminer_board_temp | Hashboard temperature |
| Fan Speed (%) | sensor.stealthminer_fan_percent | Fan speed percentage |
| Fan Speed (RPM) | sensor.stealthminer_fan_rpm | Fan speed in RPM |
| Shares Accepted | sensor.stealthminer_shares_accepted | Total accepted shares |
| Shares Rejected | sensor.stealthminer_shares_rejected | Total rejected shares |
| Shares Stale | sensor.stealthminer_shares_stale | Total stale shares |
| Active Pool | sensor.stealthminer_pool | Current pool URL |
| Active Profile | sensor.stealthminer_profile | Active profile name |
| Status | sensor.stealthminer_status | Miner operational status |
Binary Sensors
| Binary Sensor | Entity Example | Description |
|---|---|---|
| Connectivity | binary_sensor.stealthminer_connectivity | Connection to miner |
| Pool Connected | binary_sensor.stealthminer_pool_connected | Pool connection status |
| ATM Active | binary_sensor.stealthminer_atm_active | Auto-Tune Mode state |
| Mining Active | binary_sensor.stealthminer_mining | Mining activity status |
Controls
| Control | Entity Example | Type | Description |
|---|---|---|---|
| ATM Toggle | switch.stealthminer_atm | Switch | Enable/disable Auto-Tune Mode |
| Sleep Mode | switch.stealthminer_sleep | Switch | Put miner in sleep mode |
| Profile Selector | select.stealthminer_profile | Select | Choose operating profile |
| Power Limit | number.stealthminer_power_limit | Number | Set power consumption limit (W) |
| Reboot | button.stealthminer_reboot | Button | Reboot the miner |
| Factory Reset | button.stealthminer_reset | Button | Factory reset (caution!) |
| Wake | button.stealthminer_wake | Button | Wake from sleep mode |
Note: Entity IDs are generated based on your miner name. Find actual IDs at Settings > Devices & Services > StealthMiner > [your device].
Installation
Step 1: Install via HACS
- Open Home Assistant
- Navigate to HACS > Integrations
- Click + Explore & Download Repositories
- Search for “StealthMiner” or “Exergy StealthMiner”
- Click Download
- Restart Home Assistant
Step 2: Add Your Miner
- Go to Settings > Devices & Services
- Click + Add Integration
- Search for “StealthMiner”
- Enter your miner’s IP address
- Click Submit
| Setting | Default | Description |
|---|---|---|
| IP Address | — | Your miner’s local IP address |
| Port | 4028 | LuxOS API port |
Step 3: Verify
The integration creates a device with all sensors and controls. Check the device page to see all available entities.
Understanding LuxOS Features
Auto-Tune Mode (ATM)
ATM automatically optimizes your miner for best performance:
- Monitors chip health and temperatures
- Adjusts frequency and voltage dynamically
- Balances hashrate vs efficiency
- Recommended for most users
Toggle ATM with switch.stealthminer_atm.
Profiles
LuxOS supports multiple operating profiles:
| Profile Type | Use Case |
|---|---|
| Default | Standard operation |
| Efficiency | Maximize W/TH efficiency |
| Performance | Maximum hashrate |
| Custom | User-defined settings |
Switch profiles via select.stealthminer_profile.
Sleep Mode
Sleep mode stops mining while keeping the miner responsive:
- Fans spin down
- Power consumption drops to idle
- Quick wake-up compared to full power cycle
- Useful for demand response or time-of-use optimization
Control with switch.stealthminer_sleep and button.stealthminer_wake.
Power Limiting
Set a maximum power draw with number.stealthminer_power_limit:
- Miner adjusts performance to stay under limit
- Useful for electrical capacity constraints
- Combine with time-of-use automations
Dashboard Integration
Create a comprehensive miner control panel:
type: vertical-stack
cards:
  - type: entities
    title: StealthMiner Status
    entities:
      - entity: sensor.stealthminer_hashrate_15m
        name: Hashrate (15m)
      - entity: sensor.stealthminer_power
        name: Power
      - entity: sensor.stealthminer_efficiency
        name: Efficiency
      - entity: sensor.stealthminer_board_temp
        name: Temperature
      - entity: binary_sensor.stealthminer_mining
        name: Mining Active

  - type: entities
    title: Controls
    entities:
      - entity: switch.stealthminer_atm
        name: Auto-Tune Mode
      - entity: switch.stealthminer_sleep
        name: Sleep Mode
      - entity: select.stealthminer_profile
        name: Profile
      - entity: number.stealthminer_power_limit
        name: Power Limit
Automation Ideas
Thermostat Integration
Use your miner as a heater controlled by room temperature:
automation:
  - alias: "StealthMiner thermostat - wake on cold"
    trigger:
      - platform: numeric_state
        entity_id: sensor.room_temperature
        below: 68
    condition:
      - condition: state
        entity_id: switch.stealthminer_sleep
        state: "on"
    action:
      - service: button.press
        target:
          entity_id: button.stealthminer_wake

  - alias: "StealthMiner thermostat - sleep on warm"
    trigger:
      - platform: numeric_state
        entity_id: sensor.room_temperature
        above: 72
    condition:
      - condition: state
        entity_id: switch.stealthminer_sleep
        state: "off"
    action:
      - service: switch.turn_on
        target:
          entity_id: switch.stealthminer_sleep
Time-of-Use Power Limiting
Reduce power during peak electricity rates:
automation:
  - alias: "StealthMiner peak rate power limit"
    trigger:
      - platform: time
        at: "16:00:00"
    action:
      - service: number.set_value
        target:
          entity_id: number.stealthminer_power_limit
        data:
          value: 2000

  - alias: "StealthMiner off-peak full power"
    trigger:
      - platform: time
        at: "21:00:00"
    action:
      - service: number.set_value
        target:
          entity_id: number.stealthminer_power_limit
        data:
          value: 3500
Pool Disconnect Alert
automation:
  - alias: "StealthMiner pool disconnect alert"
    trigger:
      - platform: state
        entity_id: binary_sensor.stealthminer_pool_connected
        to: "off"
        for:
          minutes: 5
    action:
      - service: notify.mobile_app
        data:
          message: "StealthMiner lost pool connection"
Profile Switching Based on Conditions
automation:
  - alias: "StealthMiner efficiency mode during peak"
    trigger:
      - platform: time
        at: "14:00:00"
    action:
      - service: select.select_option
        target:
          entity_id: select.stealthminer_profile
        data:
          option: "Efficiency"

  - alias: "StealthMiner performance mode off-peak"
    trigger:
      - platform: time
        at: "22:00:00"
    action:
      - service: select.select_option
        target:
          entity_id: select.stealthminer_profile
        data:
          option: "Performance"
Troubleshooting
Integration not finding miner
- Verify miner is powered and connected to network
- Confirm IP address is correct
- Check port 4028 is accessible:
telnet [IP] 4028 - Verify LuxOS firmware is installed and running
Controls not responding
- Some controls require specific LuxOS versions
- Check miner is not in a transitional state
- Reload the integration
- Check Home Assistant logs for API errors
ATM not working as expected
- ATM requires time to tune (hours to days for optimal results)
- Check chip health in LuxOS web interface
- Manual profile changes may override ATM settings
Entities showing “Unavailable”
- Check miner is online and reachable
- Verify port 4028 connectivity
- Reload the integration: Settings > Devices & Services > StealthMiner > ⋮ > Reload
- Review Home Assistant logs
What’s Next?
Monitor Pool Stats
- Ocean Pool Integration - For Ocean pool stats
- Public Pool Integration - For self-hosted pools
Set Up Heating Automation
- Space Heater Thermostat Control - Temperature control
- HVAC Integration - Whole-home integration
- Time-of-Use Control - Optimize around electricity rates
Build a Dashboard
- Dashboard Templates - Pre-built interfaces
Source Code & Support
- GitHub: github.com/exergyheat/ha-integration-stealthminer
- Support Forum: support.exergyheat.com
Home Assistant Automations and Templates
Automations are the smart logic that makes your smart home actually smart. They connect your integrations together—triggering actions based on sensor readings, schedules, or device states. This is what transforms a bitcoin miner into a functional heater for your home.
What Are Automations?
Integrations connect your devices to Home Assistant. Automations make them work together.
Every automation follows the same pattern:
- Trigger - What starts the automation (temperature drops, time of day, button press)
- Condition - Optional checks before proceeding (only if home, only on weekdays)
- Action - What happens (turn on miner, adjust power level, send notification)
Example: When room temperature drops below 68°F (trigger), and it’s between 6am-10pm (condition), turn on the miner in heating mode (action).
This is the special sauce that lets a bitcoin miner replace your space heater, tie into your whole-home thermostat, or only run when electricity is cheap.
Use cases we cover:
- Space heater replacement - Miner maintains room temperature using a temp sensor
- HVAC integration - Miner responds to your whole-home thermostat
- Time-of-use optimization - Mine during cheap electricity, reduce during peak rates
- Solar monetization - Use excess solar production for mining instead of selling back cheap
- Scheduled operation - Run on custom schedules with different modes
These automations pair with Exergy hardware kits and installed systems, but work with any compatible setup.
Available Exergy Automation Templates
| Template | Use Case |
|---|---|
| Space Heater | Room temperature control with miner as heat source |
| HVAC Integration | Whole-home thermostat integration |
| Time-of-Use | Optimize mining around electricity rates |
See all Exergy Automations: github.com/exergyheat
Building Your Own Automations
Don’t see what you need? Build custom automations:
Visual Editor - Home Assistant’s built-in editor walks you through triggers, conditions, and actions without code.
YAML - Write automations directly for more control and easier version management.
Node-RED - Visual flow-based programming for complex logic. Install via the Node-RED add-on.
Home Assistant’s automation system is powerful. Start with our blueprints, then customize or build your own as you learn.
Contributing Blueprints and Automations
Created a useful automation for hashrate heating? Share it with the community:
- Guides Forum - Post your automation for discussion
- GitHub - Submit a PR to add your blueprint to the official collection
Learn More
- Home Assistant Automation Docs - Complete automation reference
- Home Assistant Blueprint Docs - Blueprint usage and creation
- Exergy Community Forum - Get help and share ideas
Space Heater Thermostat Control - Exergy HA Blueprint
Control your bitcoin miner like a traditional space heater with thermostatic temperature control.
Before You Start
- Miner connected to Home Assistant - Install the Canaan Avalon Home Integration first
- Temperature sensor - Zigbee, WiFi, or any HA-compatible sensor in the room
- Home Assistant with HACS - See our system configuration guide if needed
How It Works
This automation turns your miner on and off based on room temperature:
- Temperature drops below target → Miner turns ON
- Temperature rises above target → Miner turns OFF
- Repeat to maintain desired temperature
Just like a space heater with a thermostat, but earning bitcoin while heating.
Automation Installation
To use the YAML automation examples in this guide:
- Copy the desired YAML code from the examples below
- In Home Assistant, navigate to Settings → Automations & Scenes
- Click the three-dot menu (⋮) in the top right corner
- Select Edit in YAML
- Paste the copied YAML code at the bottom of your automations file
- Adjust the entity_id values to match your specific miner entities
- Click Save
- The new automation(s) will appear in your automations list
Alternatively, you can create each automation through the UI and manually configure the triggers, conditions, and actions based on the examples.
Configuration
Required Inputs
| Input | Description |
|---|---|
| Miner Entity | Your miner’s power switch (e.g., switch.avalon_mini_3_power) |
| Temperature Sensor | Room temperature sensor (e.g., sensor.living_room_temperature) |
| Target Temperature | Desired room temperature |
Note: This example uses the Avalon Mini 3 onboard input or ambient temperature sensors for reporting to the thermostat. You could instead use a different temperature sensor in the room such as a Zigbee Temperature sensor.
Optional Inputs
| Input | Default | Description |
|---|---|---|
| Hysteresis | 1.0°F | Temperature band to prevent rapid cycling |
| Minimum On Time | 5 min | Prevent short cycles |
| Minimum Off Time | 5 min | Allow miner to cool down |
Understanding Hysteresis
Hysteresis prevents the miner from rapidly turning on and off:
Example with 70°F target temperature and 1°F hysteresis:
- Miner turns ON when temp drops to 69°F
- This is the Cold Tolerance reference below
- Miner turns OFF when temp rises to 71°F
- This is the Hot Tolerance reference below
- 2°F total swing (target ± hysteresis)
Increase hysteresis for longer, less frequent cycles. Decrease for tighter temperature control.
Creating a Climate Helper
The recommended approach is to create a Generic Thermostat climate entity that controls your miner. This gives you a native thermostat interface in Home Assistant.
Method 1: GUI Configuration
- Navigate to Settings → Devices & Services → Helpers
- Click + Create Helper
- Select Generic Thermostat
- Configure the following:
| Setting | Value | Description |
|---|---|---|
| Name | Exergy Office | Name for your thermostat |
| Heater | switch.exergy_office_mini_3_power | Your miner’s power switch |
| Target Sensor | sensor.exergy_office_sensor_temperature | Room temperature sensor |
| Min Temp | 60 | Minimum temperature setting |
| Max Temp | 80 | Maximum temperature setting |
| Target Temp | 70 | Default target temperature (this is editable from the dashboard after being deployed) |
| Cold Tolerance | 1 | How far below target before turning on |
| Hot Tolerance | 1 | How far above target before turning off |
| Min Cycle Duration | 10 seconds | Minimum time heater stays in one state |
- Click Create
Method 2: YAML Configuration
Add this to your configuration.yaml file:
climate:
  - platform: generic_thermostat
    name: Exergy Office
    heater: switch.exergy_office_mini_3_power #Your Miner Power Switch
    target_sensor: sensor.exergy_office_mini_3_ambient_temperature #Or use an external sensor like: sensor.exergy_office_sensor_temperature
    min_temp: 60 #Set the lowest temp you'll allow this thermostat to be set
    max_temp: 80 #Set the highest temp you'll allow this thermostat to be set
    ac_mode: false
    target_temp: 70 #Default starting temp
    cold_tolerance: 1
    hot_tolerance: 1
    min_cycle_duration:
      seconds: 10
    keep_alive:
      minutes: 3
    initial_hvac_mode: "heat" #Thermostat defaults to heating mode, can also be set to off
    precision: 0.5 #Amout you want to be able to set the thermostat. 0.5 = 70,70.5,80, etc.
After adding the YAML configuration:
- Go to Developer Tools → YAML
- Click Check Configuration
- If valid, click Restart under Server Controls
Understanding the Parameters
| Parameter | Description |
|---|---|
| heater | The switch entity that controls your miner |
| target_sensor | Temperature sensor that measures room temperature |
| cold_tolerance | Temperature drops this much below target before turning ON |
| hot_tolerance | Temperature rises this much above target before turning OFF |
| min_cycle_duration | Prevents rapid on/off cycling |
| keep_alive | Sends periodic updates to the heater switch |
| initial_hvac_mode | Mode when Home Assistant starts (“heat” or “off”) |
| precision | Temperature adjustment increment (0.5 or 1.0) |
Example: 70°F Target with 1° Tolerance
- Miner turns ON when temperature drops to 69°F (70 - 1)
- Miner turns OFF when temperature rises to 71°F (70 + 1)
- Total swing: 2°F
Tips
External Sensor Placement
- Place temperature sensor at “living height” (3-5 feet)
- Keep away from direct miner exhaust
- Avoid windows, exterior walls, or direct sunlight
Multiple Rooms
- Create separate automations for each room/miner pair
- Each automation tracks its own temperature sensor
Work Mode Considerations
- Heating Mode: Full power, maximum heat output
- Eco Mode: Reduced power, may not reach target temperature
- Night Mode: Quieter but less heat
Consider automations that adjust work mode based on time of day.
Troubleshooting
Miner cycling too frequently
- Increase hysteresis value
- Increase minimum on/off times
- Check sensor placement (may be too close to miner)
Room never reaches target temperature
- Miner may not have enough heat output for space
- Check for drafts or heat loss
- Consider running in higher power mode
Temperature overshoots
- Miner continues heating during shutdown
- Increase hysteresis slightly
- Normal behavior - mining hardware retains heat
Dashboard Integration
See Space Heater Digital Thermostat for a matching dashboard to control this automation visually.
Resources
HVAC Integrated Thermostat Control - Exergy HA Blueprint
Integrate your bitcoin miner into your home’s HVAC system as “Stage 1” heating, with your existing furnace as backup.
Before You Start
- Miner connected to Home Assistant - Install the Canaan Avalon Home Integration first
- Smart thermostat - Connected to HA (Z-Wave, Zigbee, or WiFi)
- Home Assistant with HACS - See our system configuration guide if needed
- Professional installation - Ducting and wiring modifications recommended
How It Works
This setup uses your miner as the primary heat source:
- Stage 1 (Miner): When heating is needed, miner turns on first
- Stage 2 (Furnace): If miner can’t keep up, furnace activates
- Miner produces bitcoin while providing base heating
- Furnace only runs when additional heat is needed
System Architecture
                    ┌─────────────────┐
                    │   Thermostat    │
                    │  (Smart/Multi)  │
                    └────────┬────────┘
                             │
         ┌───────────────────┼───────────────────┐
         │                   │                   │
         ▼                   ▼                   ▼
  ┌──────────────┐   ┌──────────────┐   ┌──────────────┐
  │  Stage 1     │   │  Stage 2     │   │  Cooling     │
  │  (Miner)     │   │  (Furnace)   │   │  (AC)        │
  │  via HA      │   │  Direct wire │   │  Direct wire │
  └──────────────┘   └──────────────┘   └──────────────┘
Automation Installation
To use the YAML automation examples in this guide:
- Copy the desired YAML code from the examples below
- In Home Assistant, navigate to Settings → Automations & Scenes
- Click the three-dot menu (⋮) in the top right corner
- Select Edit in YAML
- Paste the copied YAML code at the bottom of your automations file
- Adjust the entity_id values to match your specific miner entities
- Click Save
- The new automation(s) will appear in your automations list
Alternatively, you can create each automation through the UI and manually configure the triggers, conditions, and actions based on the examples.
Configuration
Required Inputs
| Input | Description |
|---|---|
| Miner Entity | Your miner’s power switch |
| Thermostat Entity | Your HVAC thermostat |
| Stage Sensor | Entity that reports which heating stage is active |
Optional Inputs
| Input | Default | Description |
|---|---|---|
| Stage 1 Delay | 30 sec | Wait time before turning on miner after Stage 1 call |
| Shutdown Delay | 60 sec | Wait time before turning off miner after call ends |
Wiring Considerations
Traditional Thermostat Wiring
Note: Our recommended thermostat is a Venstar T7900 for its ability to be controlled via local APIs without the need for Cloud interface or third party servers
Standard HVAC wiring:
- W1: Stage 1 heat (becomes miner via HA)
- W2: Stage 2 heat (remains wired to furnace)
- Y: Cooling
- G: Fan
- C: Common (power)
Modification Approach
- Disconnect W1 from furnace control board
- W1 now only signals Home Assistant (via smart thermostat)
- W2 remains connected to furnace
- HA controls miner based on W1 signal
This is just an example. Please consult an HVAC professional for your specific system.
Example Configuration
automation:
  - alias: Control switch based on upstairs thermostat heating
    description: Turn switch on/off based on active heating state
    triggers:
      - entity_id: climate.thermostat
        attribute: hvac_action
        to: heating
        id: heating_started
        trigger: state
      - entity_id: climate.thermostat
        attribute: hvac_action
        from: heating
        id: heating_stopped
        trigger: state
    conditions: []
    actions:
      - choose:
          - conditions:
              - condition: trigger
                id: heating_started
            sequence:
              - action: switch.turn_on
                data: {}
                target:
                  entity_id: switch.avalon_q_power
          - conditions:
              - condition: trigger
                id: heating_stopped
            sequence:
              - action: switch.turn_off
                data: {}
                target:
                  entity_id: switch.avalon_q_power
    mode: restart
Airflow Requirements
Duct Sizing
- Match miner CFM output to duct capacity
- Avalon Q: ~200 CFM typical
- Ensure no backpressure on miner fans
Plenum Connection
- Connect to supply plenum (after furnace heat exchanger)
- Use insulated flex duct
- Include damper for isolation when miner is off
Safety Considerations
- Install high-limit safety switch
- Ensure proper condensate drainage
- CO detector near furnace (as always)
Performance Expectations
Typical Savings
With an Avalon Q (~5,630 BTU/hr):
- Covers ~30-50% of heating needs in moderate climates
- Furnace runs significantly less
- Bitcoin earnings offset electricity costs
Best Results
- Well-insulated homes
- Moderate heating climates
- Time-of-use electricity rates (mine during cheap hours)
Troubleshooting
Miner not turning on
- Verify thermostat is reporting heating mode to HA
- Check automation triggers are correct
- Confirm miner is available in HA
Furnace activating too often
- Miner may not provide enough heat
- Increase target temperature differential
- Consider additional miner or higher power mode
Short cycling
- Add delays to automations
- Increase thermostat hysteresis
- Check airflow through miner
Dashboard Integration
See HVAC Integrated Wall+Digital Thermostat for a matching dashboard to monitor this setup.
Resources
Time of Use Control - Exergy HA Blueprint
Schedule your bitcoin miner to run during specific times based on electricity rates, daily schedules, or personal preferences.
Before You Start
- Miner connected to Home Assistant - Install the Canaan Avalon Home Integration first
- Home Assistant with HACS - See our system configuration guide if needed
- Know your electricity rate schedule - Check your utility bill for TOU periods
How It Works
This automation controls when your miner operates:
- Run during cheap electricity (off-peak hours)
- Reduce or stop during expensive hours (peak rates)
- Follow a weekly schedule for consistent operation
- Combine with other automations for advanced control
Use Cases
Time-of-Use Electricity Rates
Many utilities charge different rates throughout the day:
- Off-peak: Evenings, nights, weekends (cheapest)
- Mid-peak: Morning, late evening
- On-peak: Afternoon hours (most expensive)
Run your miner during off-peak hours to maximize profitability.
Noise Considerations
- Run at full power when away from home
- Reduce to eco/night mode during sleeping hours
- Pause during important calls or meetings
Seasonal Adjustments
- Run more during heating season
- Reduce during summer months
- Adjust based on weather conditions
Automation Installation
To use the YAML automation examples in this guide:
- Copy the desired YAML code from the examples below
- In Home Assistant, navigate to Settings → Automations & Scenes
- Click the three-dot menu (⋮) in the top right corner
- Select Edit in YAML
- Paste the copied YAML code at the bottom of your automations file
- Adjust the entity_id values to match your specific miner entities
- Click Save
- The new automation(s) will appear in your automations list
Alternatively, you can create each automation through the UI and manually configure the triggers, conditions, and actions based on the examples.
Configuration
Required Inputs
| Input | Description |
|---|---|
| Miner Entity | Your miner’s power switch |
| Schedule | Time periods and desired actions |
Schedule Options
For each time period, choose:
- Full Power: Mining mode at maximum
- Eco Mode: Reduced power/noise
- Night Mode: Quiet operation
- Off: Completely powered down
Example Schedules
Basic Peak/Off-Peak (California TOU)
| Time | Action | Reason |
|---|---|---|
| 12:00 AM - 4:00 PM | Full Power | Off-peak rates |
| 4:00 PM - 9:00 PM | Eco Mode | Peak rates |
| 9:00 PM - 12:00 AM | Full Power | Off-peak rates |
Work from Home
| Time | Day | Action | Reason |
|---|---|---|---|
| 6:00 AM - 8:00 AM | Weekdays | Night Mode | Morning routine |
| 8:00 AM - 6:00 PM | Weekdays | Eco Mode | Working hours (noise) |
| 6:00 PM - 10:00 PM | Weekdays | Full Power | Evening heating |
| 10:00 PM - 6:00 AM | All days | Night Mode | Sleeping hours |
| All day | Weekends | Full Power | Away or flexible |
Heating Season Focus
| Month | Default Mode |
|---|---|
| Oct - Mar | Full Power (heating needed) |
| Apr - May | Eco Mode (mild weather) |
| Jun - Sep | Off or Eco (no heat needed) |
Manual YAML Examples
Simple Peak/Off-Peak
automation:
  - alias: "Miner Off-Peak - Full Power"
    trigger:
      - platform: time
        at: "21:00:00"
    action:
      - service: switch.turn_on
        target:
          entity_id: switch.avalon_mini_3_power
      - service: select.select_option
        target:
          entity_id: select.avalon_mini_3_work_mode
        data:
          option: "Mining"
      - service: select.select_option
        target:
          entity_id: select.avalon_mini_3_work_level
        data:
          option: "Super"

  - alias: "Miner Peak - Eco Mode"
    trigger:
      - platform: time
        at: "16:00:00"
    action:
      - service: switch.turn_on
        target:
          entity_id: switch.avalon_mini_3_power
      - service: select.select_option
        target:
          entity_id: select.avalon_mini_3_work_mode
        data:
          option: "Heating"
      - service: select.select_option
        target:
          entity_id: select.avalon_mini_3_work_level
        data:
          option: "Eco"
Weekly Schedule with Conditions
automation:
  - alias: "Miner Weekday Work Hours - Quiet"
    trigger:
      - platform: time
        at: "08:00:00"
    condition:
      - condition: time
        weekday:
          - mon
          - tue
          - wed
          - thu
          - fri
    action:
      - service: select.select_option
        target:
          entity_id: select.avalon_mini_3_work_mode
        data:
          option: "Night"

  - alias: "Miner Weekend - Full Power"
    trigger:
      - platform: time
        at: "00:00:00"
    condition:
      - condition: time
        weekday:
          - sat
          - sun
    action:
      - service: select.select_option
        target:
          entity_id: select.avalon_mini_3_work_mode
        data:
          option: "Heating"
      - service: select.select_option
        target:
          entity_id: select.avalon_mini_3_work_level
        data:
          option: "Super"
Dynamic Rate Integration
If you have a utility rate sensor (via integration):
automation:
  - alias: "Miner Rate-Based Control"
    trigger:
      - platform: state
        entity_id: sensor.utility_rate_tier
    action:
      - choose:
          - conditions:
              - condition: state
                entity_id: sensor.utility_rate_tier
                state: "off_peak"
            sequence:
              - service: switch.turn_on
                target:
                  entity_id: switch.avalon_mini_3_power
          - conditions:
              - condition: state
                entity_id: sensor.utility_rate_tier
                state: "on_peak"
            sequence:
              - service: switch.turn_off
                target:
                  entity_id: switch.avalon_mini_3_power
Note: You can also make your own utility rate sensor via a helper entity
Combining with Temperature Control
Time-of-use works alongside thermostat control:
- Time-of-use sets the maximum allowed operation
- Thermostat control decides within those windows
Example:
- Off-peak: Thermostat can control miner freely
- Peak: Miner stays off regardless of temperature
automation:
  - alias: "Peak Hours - Override Thermostat"
    trigger:
      - platform: time
        at: "16:00:00"
    action:
      - service: climate.set_hvac_mode
        target:
          entity_id: climate.your_thermostat
        data:
          hvac_mode: "off"

  - alias: "Off-Peak - Enable Thermostat"
    trigger:
      - platform: time
        at: "21:00:00"
    action:
      - service: climate.set_hvac_mode
        target:
          entity_id: climate.your_thermostat
        data:
          hvac_mode: "heat"
Tips
Find Your Utility Rates
- Check your utility bill for TOU schedule
- Look for “Time of Use” or “TOU” rate plans
- Some utilities offer APIs or integrations
Buffer Times
Add 15-30 minutes buffer before peak times:
- Prevents running into peak rates
- Allows miner to cool down gracefully
Seasonal Adjustments
Create separate automations for:
- Winter (heating priority)
- Summer (mining only when profitable)
- Shoulder seasons (flexible)
Dynamic Control of TOU Times
Create separate ‘helper’ entities to edit on the fly such as:
- Create a date and/or time helper to set the different TOU periods
- Easier to edit this entity than the automation
- Create a schedule helper to build out different triggers based on time periods
Troubleshooting
Miner not following schedule
- Check automation triggers are correct
- Verify time zone settings in HA
- Look for conflicting automations
Overlapping automations
- Review all miner-related automations
- Use automation groups or modes
- Consider a single “scheduler” automation
Resources
Home Assistant Dashboards
Dashboards are your custom interface to Home Assistant. They’re the screens where you see your data, control your devices, and monitor your systems—viewable from the companion mobile app or any web browser.
What Are Dashboards?
Integrations connect your devices. Automations make them work together. Dashboards let you see and control everything.
A dashboard is a customizable screen you design:
- Cards display data (temperatures, hashrates, power consumption)
- Buttons trigger actions (turn on miner, change work mode)
- Gauges and graphs visualize trends over time
- Controls adjust settings (target temperature, power levels)
Think of it as building your own app interface. You decide exactly what information appears and how it’s organized—like designing a custom control panel for your smart home.
What Are Dashboard Templates?
Dashboard templates are pre-built configurations you can import and customize.
Instead of designing from scratch, you:
- Import the template YAML
- Update entity IDs to match your devices
- Adjust layout and styling to your preference
Templates vs Dashboards: A template is a shareable starting point (YAML file). A dashboard is your running interface. One template can be customized into many different dashboards for different setups.
Why Exergy Makes Dashboard Templates
We design interfaces specifically for hashrate heating systems. Our templates show everything you need in one place:
Heating controls:
- Thermostat-style display (target temp, current temp)
- Heating status (active, idle, off)
- Mode selection (heating, mining, eco)
Miner stats:
- Real-time hashrate and power consumption
- Temperature readings (intake, exhaust, hashboard)
- Device status and work mode
Mining earnings:
- Sats earned today/this month
- Recent payout history
- Pool statistics
It’s like a smart thermostat display—but with your bitcoin mining data alongside the temperature controls. One glance tells you if your room is warm, your miner is healthy, and how much you’ve earned.
Available Exergy Dashboard Templates
| Template | Use Case |
|---|---|
| Space Heater | Thermostat-style interface for room heating with a miner |
| HVAC Integration | Whole-home system monitoring and control |
Live Demo: See a fully configured system at demo.exergyheat.com
All templates available on GitHub: github.com/exergyheat
Installing Dashboard Templates
Two methods to install any template:
Copy YAML (fastest)
- Go to Settings → Dashboards and create a new dashboard
- Open the raw configuration editor (three dots menu)
- Paste the template YAML and update entity IDs
Card by Card
- Use the template as a visual reference
- Add cards manually in the dashboard editor
- Configure each card with your entities
Each template’s dedicated page has detailed installation and customization steps.
Building Your Own Dashboards
Home Assistant’s dashboard editor is powerful and visual:
Visual Editor - Drag and drop cards, configure with forms, no code required.
YAML Mode - Direct YAML editing for precise control and easy sharing.
Custom Cards - Install community cards via HACS for advanced features:
- mini-graph-card for compact history graphs
- mushroom cards for modern, clean styling
- button-card for highly customized controls
Design tips: Keep key info visible at a glance. Put common controls within easy reach. Test on both phone and desktop.
Contributing Dashboard Templates
Created a useful dashboard for hashrate heating? Share it with the community:
- Guides Forum - Post screenshots and YAML
- GitHub - Submit a PR to add your template to the official collection
Learn More
- Home Assistant Dashboard Docs - Complete dashboard reference
- Exergy Demo - Live example of configured dashboards
- Exergy Community Forum - Get help and share ideas
Upstairs Avalon Q + Furnace Hybrid Dashboard - Exergy HA Dashboard
A dashboard for monitoring and controlling a hybrid Avalon Q bitcoin heater integrated with a furnace backup system, featuring wall thermostat control and adjustable power modes.
Overview
This dashboard provides:
- Venstar wall thermostat interface
- Three-tier power mode control (Super, Standard, Eco)
- Real-time temperature monitoring
- Mining statistics and earnings tracking
- Dual heating source coordination (Bitcoin heater + furnace)
Before You Start
This dashboard requires:
- Miner connected - Canaan Avalon Home Integration
- Thermostat connected - Venstar or other smart thermostat in HA
- Ocean pool integration - Ocean Mining Pool Integration for earnings data
Equipment
- Primary Heat: Avalon Q Bitcoin Heater
- Backup Heat: Furnace (HVAC system)
- Control: Venstar Wall Thermostat
- Power Modes: Super (~1.7kW), Standard (~1.2kW), Eco (~0.8kW)
Required Integrations
- Venstar: Thermostat integration (Optional to use the Generic Thermostat instead)
- Exergy Avalon Home Miner: Miner Integration
- OCEAN Mining Pool: Exergy Integration to pull in OCEAN Mining Pool Stats
Installation
Add to Existing Dashboard or Create new
- Copy the YAML below and add it as a new view to your existing dashboard or create a new one.
- Go to Settings → Dashboards
- Select an existing dashboard or create a new one
- Click three dots → Edit Dashboard → Add View
- Switch to YAML mode and paste the view configuration below
- Update entity IDs to match your system
- Save
Dashboard YAML
Complete Upstairs View
- type: sections
  max_columns: 4
  title: Upstairs
  path: upstairs
  sections:
    - type: grid
      cards:
        - type: heading
          heading: Venstar Wall Thermostat Control
          heading_style: subtitle
        - type: thermostat
          entity: climate.upstairs_thermostat
          show_current_as_primary: false
          features:
            - style: icons
              type: climate-hvac-modes
              hvac_modes:
                - heat
                - 'off'
        - type: heading
          icon: ''
          heading: Mode Control
          heading_style: subtitle
        - type: horizontal-stack
          cards:
            - name: Super
              show_name: true
              show_icon: true
              type: button
              entity: sensor.avalon_q_hashrate
              icon: mdi:fire
              icon_height: 30px
              show_state: false
              hold_action:
                action: none
              tap_action:
                action: perform-action
                perform_action: select.select_option
                target:
                  entity_id: select.avalon_q_work_level
                data:
                  option: Super
            - name: Standard
              show_name: true
              show_icon: true
              type: button
              entity: sensor.avalon_q_hashrate
              icon: mdi:lightning-bolt
              icon_height: 30px
              show_state: false
              hold_action:
                action: none
              tap_action:
                action: perform-action
                perform_action: select.select_option
                target:
                  entity_id: select.avalon_q_work_level
                data:
                  option: Standard
            - name: Eco
              show_name: true
              show_icon: true
              type: button
              entity: sensor.avalon_q_hashrate
              icon: mdi:leaf
              icon_height: 30px
              show_state: false
              hold_action:
                action: none
              tap_action:
                action: perform-action
                perform_action: select.select_option
                target:
                  entity_id: select.avalon_q_work_level
                data:
                  option: Eco
    - type: grid
      cards:
        - type: heading
          heading: Stats
          heading_style: subtitle
        - graph: line
          type: sensor
          detail: 1
          icon: mdi:home-thermometer
          grid_options:
            columns: 12
            rows: 2
          name: Room Temperature
          entity: sensor.upstairs_thermostat_space_temperature
        - type: entities
          entities:
            - entity: sensor.avalon_q_state
              name: State
              icon: mdi:list-status
              secondary_info: last-updated
            - entity: sensor.avalon_q_work_level
              name: Heating Level
              icon: mdi:arrow-expand
              secondary_info: last-updated
            - entity: sensor.avalon_q_hashrate
              name: Hashrate
              secondary_info: last-updated
              icon: mdi:chart-timeline-variant
            - entity: sensor.avalon_q_power
              secondary_info: last-updated
            - entity: sensor.q_lifetime_earnings
              icon: mdi:bitcoin
              secondary_info: last-updated
              name: Lifetime Earnings
          footer:
            type: graph
            entity: sensor.q_lifetime_earnings
            detail: 1
            hours_to_show: 336
          show_header_toggle: false
          state_color: false
  header:
    card:
      type: markdown
      text_only: true
      content: |-
        **Hello {{ user }}**
        Welcome to your Hybrid Avalon Q + Furnace System
  badges:
    - type: entity
      show_name: true
      show_state: false
      show_icon: true
      name: Pool Dashboard
      tap_action:
        action: url
        url_path: https://ocean.xyz/stats/[YOUR OCEAN ADDRESS].[WORKER]
      icon: mdi:pickaxe
      entity: update.advanced_ssh_web_terminal_update #This can be anything, it's just a placeholder
    - type: entity
      show_name: true
      show_state: false
      show_icon: true
      entity: update.advanced_ssh_web_terminal_update #This can be anything, it's just a placeholder
      tap_action:
        action: url
        url_path: https://support.exergyheat.com
      icon: mdi:face-agent
      name: Support
    - type: entity
      show_name: true
      show_state: false
      show_icon: true
      entity: update.advanced_ssh_web_terminal_update #This can be anything, it's just a placeholder
      tap_action:
        action: url
        url_path: https://docs.exergyheat.com
      icon: mdi:book
      name: Documentation
Entity ID Reference
Update these placeholders with your actual entities:
| Placeholder | Description | How to Find |
|---|---|---|
| climate.upstairs_thermostat | Venstar wall thermostat | Settings → Devices → Venstar Thermostat |
| sensor.upstairs_thermostat_space_temperature | Current room temperature | Same device as thermostat |
| sensor.avalon_q_state | Miner operational state | Settings → Devices → Avalon Q |
| sensor.avalon_q_work_level | Current power mode | Settings → Devices → Avalon Q |
| select.avalon_q_work_level | Power mode selector | Settings → Devices → Avalon Q |
| sensor.avalon_q_hashrate | Mining hashrate | Settings → Devices → Avalon Q |
| sensor.avalon_q_power | Power consumption | Settings → Devices → Avalon Q |
| sensor.q_lifetime_earnings | Bitcoin earnings | Settings → Integrations → OCEAN Mining Pool → Select Miner → Q → Lifetime Earnings |
Power Mode Details
Super Mode
- Power: ~1,700W
- Hashrate: ~90 TH/s
- Use Case: Maximum heat output, coldest days
- Noise: Loudest
- Earnings: Highest
Standard Mode
- Power: ~1,200W
- Hashrate: ~75-80 TH/s
- Use Case: Normal heating needs
- Noise: Moderate
- Earnings: Medium
Eco Mode
- Power: ~800W
- Hashrate: ~50 TH/s
- Use Case: Mild days, shoulder season
- Noise: Quietest
- Earnings: Lower
Customization
Change Power Mode Options
To add or modify power modes, update the button tap actions:
tap_action:
  action: perform-action
  perform_action: select.select_option
  target:
    entity_id: select.avalon_q_work_level
  data:
    option: Custom  # Add your custom mode here
Customize Temperature Graph
Adjust the temperature history graph display:
- graph: line
  type: sensor
  detail: 1  # Change detail level (1-2)
  icon: mdi:home-thermometer
  grid_options:
    columns: 12  # Adjust width (1-12)
    rows: 2      # Adjust height
  name: Room Temperature
  entity: sensor.upstairs_thermostat_space_temperature
Add Additional Temperature Sensors
Add more temperature monitoring to the stats section:
- type: tile
  entity: sensor.bedroom_temperature
  name: Bedroom Temp
  vertical: false
  features_position: bottom
Customize Pool Dashboard Link
Update the badge to point to your specific pool worker:
- type: entity
  show_name: true
  show_state: false
  show_icon: true
  name: Pool Dashboard
  tap_action:
    action: url
    url_path: https://ocean.xyz/stats/YOUR_WALLET.YOUR_WORKER_NAME
  icon: mdi:pickaxe
  entity: update.advanced_ssh_web_terminal_update #This can be anything, it's just a placeholder
Advanced: Temperature-Based Mode Automation
Automatically adjust power modes based on outdoor temperature:
automation:
  - alias: "Upstairs - Auto Adjust Power Mode"
    trigger:
      - platform: numeric_state
        entity_id: sensor.outdoor_temperature
        below: 20
    action:
      - service: select.select_option
        target:
          entity_id: select.avalon_q_work_level
        data:
          option: Super

  - alias: "Upstairs - Eco Mode When Mild"
    trigger:
      - platform: numeric_state
        entity_id: sensor.outdoor_temperature
        above: 40
    action:
      - service: select.select_option
        target:
          entity_id: select.avalon_q_work_level
        data:
          option: Eco
Individual Card Examples
Standalone Thermostat Card
type: thermostat
entity: climate.upstairs_thermostat
show_current_as_primary: false
features:
  - style: icons
    type: climate-hvac-modes
    hvac_modes:
      - heat
      - 'off'
Power Mode Buttons Only
type: horizontal-stack
cards:
  - name: Super
    type: button
    entity: sensor.avalon_q_hashrate
    icon: mdi:fire
    tap_action:
      action: perform-action
      perform_action: select.select_option
      target:
        entity_id: select.avalon_q_work_level
      data:
        option: Super
  - name: Standard
    type: button
    entity: sensor.avalon_q_hashrate
    icon: mdi:lightning-bolt
    tap_action:
      action: perform-action
      perform_action: select.select_option
      target:
        entity_id: select.avalon_q_work_level
      data:
        option: Standard
  - name: Eco
    type: button
    entity: sensor.avalon_q_hashrate
    icon: mdi:leaf
    tap_action:
      action: perform-action
      perform_action: select.select_option
      target:
        entity_id: select.avalon_q_work_level
      data:
        option: Eco
Mining Statistics Card
type: entities
title: Avalon Q Stats
entities:
  - entity: sensor.avalon_q_state
    name: State
    icon: mdi:list-status
  - entity: sensor.avalon_q_work_level
    name: Heating Level
  - entity: sensor.avalon_q_hashrate
    name: Hashrate
  - entity: sensor.avalon_q_power
    name: Power Draw
  - entity: sensor.q_lifetime_earnings
    name: Lifetime Earnings
    icon: mdi:bitcoin
footer:
  type: graph
  entity: sensor.q_lifetime_earnings
  detail: 1
  hours_to_show: 336
Troubleshooting
Thermostat Not Responding
- Verify Venstar integration is configured
- Check thermostat is online and connected to WiFi
- Confirm entity ID matches your actual thermostat
Power Mode Buttons Not Working
- Ensure Avalon Q integration is installed
- Verify select.avalon_q_work_level entity exists
- Check miner is online and accessible
Temperature Graph Not Displaying
- Confirm sensor.upstairs_thermostat_space_temperature exists
- Check sensor is reporting data
- Verify entity has a history (may take a few minutes after setup)
Lifetime Earnings Showing 0
- Ensure Ocean pool integration is configured
- Verify template sensor is created in configuration.yaml
- Check sensor.q_lifetime_earnings exists and has data
Badges Not Clickable
- Verify URLs in tap_action are correct
- Update pool worker name and wallet address
- Use a real entity (like update.advanced_ssh_web_terminal_update) or create a dummy input_text
Mobile View
The dashboard automatically adapts to mobile screens:
- Cards stack vertically
- Power mode buttons remain side-by-side and scrollable
- Temperature graph scales to screen width
Resources
- HVAC Integrated Thermostat Control - Automation for this setup
- Home Assistant Sections Dashboard
- Venstar Integration
- Template Sensors
- Ocean Mining Pool
- Exergy GitHub - Dashboard Templates
Calculators
Exergy provides free online calculators to help you evaluate whether Bitcoin mining-powered heating makes sense for your situation. These tools let you model real-world scenarios using live Bitcoin network data, regional energy prices, and your specific circumstances.
Why We Built These
Hashrate heating economics depend on many variables: your electricity rate, local fuel prices, Bitcoin network conditions, and the mining hardware you choose. Rather than rely on rough estimates, our calculators let you plug in your actual numbers and see exactly what you’d save (or spend) compared to traditional heating.
What You Can Figure Out
- Is hashrate heating right for me? Compare the effective cost of heating with a Bitcoin miner vs. your current fuel (natural gas, propane, heating oil, or heat pump).
- How much will I save? See your potential monthly and annual savings in dollars.
- What’s my break-even electricity rate? Find the maximum $/kWh where hashrate heating still beats your alternatives.
- How do different miners compare? Evaluate space heater-class miners vs. HVAC-integrated units.
- How sensitive are my results? Explore how changes in BTC price, electricity rates, or fuel costs affect your bottom line.
Available Calculators
Hashrate Heating Calculator
Our flagship calculator for evaluating Bitcoin mining as a heating strategy. Features include:
- Live Bitcoin data - Real-time BTC price and network hashrate from public APIs
- Regional pricing - Pre-loaded electricity and fuel prices for all 50 US states and 13 Canadian provinces
- Multiple fuel comparisons - Natural gas, propane, heating oil, electric resistance, heat pump, and wood pellets
- 8 miner presets - Popular heating miners with custom input option
- Interactive charts - Sensitivity analysis showing how results change with different variables
- Geographic heat map - Visual comparison across all regions
Solar Monetization Calculator
Evaluate whether Bitcoin mining is a better use of your solar energy than selling it back to the grid. Features include:
- Three input modes - Estimate from location, enter your production data, or model excess solar
- NREL PVWatts integration - Automatic solar production estimates by ZIP code
- Net metering comparison - Compare mining against bill credits, net billing, or annual cash-out
- kWh-based calculations - Only miner efficiency matters
- Three-Knob Override System - Model different BTC prices, network conditions, and fee environments
- Monthly breakdown charts - See seasonal variations in solar mining revenue
More calculators coming soon.
Hashrate Heating Calculator
The Hashrate Heating Calculator helps you determine whether Bitcoin mining is a cost-effective way to heat your home. By comparing the net cost of running a mining heater against traditional fuel sources, you can make an informed decision about whether hashrate heating makes sense for your situation.
Quick Start
- Select your location - Choose your country and state/province to auto-load regional electricity and fuel prices
- Enter your electricity rate - Use the direct input or bill calculator
- Choose a fuel to compare against - Select what you currently use for heating
- Select a miner - Pick from presets or enter custom specs
- Review your results - See COPe, subsidy %, and savings vs. your current fuel
The calculator uses live Bitcoin network data and updates results in real-time as you adjust inputs.
Understanding the Inputs
Bitcoin Network Data
The calculator fetches live data from public APIs:
| Metric | Source | Description |
|---|---|---|
| BTC Price | CoinGecko | Current Bitcoin price in USD (converted to CAD for Canada) |
| Network Hashrate | Mempool.space | Total computing power securing the Bitcoin network (EH/s) |
| Hashprice | Calculated | Revenue earned per terahash per day ($/TH/day) |
| Hashvalue | Calculated | Satoshis earned per terahash per day (sats/TH/day) |
The Three-Knob Override System
For “what-if” scenario analysis, you can override live data using three independent controls:
Knob 1 - Price Group:
- Edit BTC Price and hashprice auto-calculates, OR
- Edit Hashprice and BTC price auto-calculates
- These two values are inversely implied—changing one recalculates the other
Knob 2 - Network Group:
- Fee % anchors this group
- Edit Network Hashrate and hashvalue recalculates (Fee % held constant), OR
- Edit Hashvalue and network hashrate recalculates (Fee % held constant)
Knob 3 - Fee Percentage:
- Slider from 0-99%
- Models transaction fee environments
- When adjusted, hashvalue recalculates (network hashrate held constant)
- Higher Fee % = more miner revenue per block
How Fee % Affects Calculations:
The block reward miners compete for consists of two parts:
- Block subsidy (currently 3.125 BTC)
- Transaction fees (variable based on network demand)
Fee % represents transaction fees as a percentage of total block reward:
Total Block Reward = Block Subsidy / (1 - Fee %)
For example, at 20% fee environment:
Total Block Reward = 3.125 / (1 - 0.20) = 3.906 BTC
This means miners earn ~25% more than the base subsidy alone.
Example Scenarios:
- “What if BTC hits $150,000?” → Adjust BTC Price (Knob 1)
- “What happens when hashrate doubles?” → Adjust Network Hashrate (Knob 2)
- “What if transaction fees spike during an ordinals frenzy?” → Increase Fee % (Knob 3)
Click “Reset to live data” to clear all overrides.
Location Selection
| Input | Options | Effect |
|---|---|---|
| Country | United States, Canada | Sets currency, units, and available regions |
| State/Province | 50 US states, 13 Canadian provinces, or “National Average” | Auto-loads regional electricity and fuel prices |
Selecting a region automatically populates default electricity and fuel rates based on regional averages. You can override these with your actual rates.
Unit differences by country:
| Fuel | US Units | Canadian Units |
|---|---|---|
| Natural Gas | $/therm | $/GJ |
| Propane | $/gallon | $/litre |
| Heating Oil | $/gallon | $/litre |
| Wood Pellets | $/bag | $/bag |
Electricity Rate
Your electricity rate is the single most important input for hashrate heating economics.
Direct entry: Enter your rate in $/kWh (or C$/kWh for Canada)
Bill calculator: If you don’t know your rate, enter:
- Total bill amount ($)
- kWh consumed
The calculator divides bill by kWh to determine your all-in rate (including delivery, taxes, and fees).
Tip: Use your winter bill for the most accurate heating season rate. Time-of-use customers should use their off-peak rate if running miners during off-peak hours.
Fuel Comparison
Select the fuel you want to compare hashrate heating against:
| Fuel Type | BTU per Unit (US) | BTU per Unit (CA) | Default Efficiency |
|---|---|---|---|
| Natural Gas | 100,000/therm | 947,817/GJ | 92% AFUE |
| Propane | 91,500/gallon | 24,200/litre | 90% AFUE |
| Heating Oil | 138,500/gallon | 36,600/litre | 85% AFUE |
| Electric Resistance | 3,412/kWh | 3,412/kWh | 100% |
| Heat Pump | 3,412/kWh | 3,412/kWh | 300% (COP 3.0) |
| Wood Pellets | 330,000/bag | 330,000/bag | 80% |
Inputs:
- Fuel rate - Cost per unit (auto-populated from region, can override)
- Efficiency - AFUE percentage for combustion fuels, or COP for heat pumps
Bill calculator: Similar to electricity, enter total fuel cost and units consumed to calculate your actual rate.
Miner Selection
Choose from 8 preset miners or enter custom specifications:
| Miner | Power (W) | Hashrate (TH/s) | Efficiency (J/TH) | Use Case |
|---|---|---|---|---|
| Heatbit Trio | 400 | 10 | 40.0 | Small space heater |
| Heatbit Maxi | 1,500 | 39 | 38.5 | Medium space heater |
| Avalon Mini 3 | 850 | 40 | 21.3 | Compact space heater |
| Avalon Q | 1,700 | 90 | 18.9 | Large space heater |
| Whatsminer M64 | 5,000 | 228 | 21.9 | HVAC integration |
| Bitmain S19j Pro | 3,068 | 104 | 29.5 | HVAC integration |
| Bitmain S19k Pro | 2,760 | 120 | 23.0 | HVAC integration |
| Bitmain S9 | 1,400 | 13.5 | 103.7 | Legacy/budget option |
Custom input: Enter any power (W) and hashrate (TH/s) combination. The calculator auto-switches to “Custom” if you modify a preset’s values.
Note: All Bitcoin miners are 100% efficient as heaters—every watt of electricity becomes heat. The J/TH efficiency only affects mining revenue, not thermal output.
Understanding the Calculations
Core Formulas
Hashvalue (sats/TH/day)
The number of satoshis a single terahash of mining power earns per day:
Hashvalue = (Blocks per Day × Total Block Reward × sats per BTC) / Network Hashrate
Where Total Block Reward accounts for transaction fees:
Total Block Reward = Block Subsidy / (1 - Fee %)
                   = 3.125 / (1 - Fee %)
At 0% fees (subsidy only):
Hashvalue = (144 × 3.125 × 100,000,000) / Network Hashrate (TH/s)
         = 45,000,000,000 / Network Hashrate (TH/s)
Example at 800 EH/s with 0% fees:
Hashvalue = 45,000,000,000 / 800,000,000 = 56.25 sats/TH/day
Example at 800 EH/s with 20% fees:
Total Block Reward = 3.125 / 0.80 = 3.906 BTC
Hashvalue = (144 × 3.906 × 100,000,000) / 800,000,000 = 70.31 sats/TH/day
Hashprice ($/TH/day)
The USD value of hashvalue:
Hashprice = Hashvalue × BTC Price / 100,000,000
Example: At 56.25 sats/TH/day and $100,000 BTC:
Hashprice = 56.25 × 100,000 / 100,000,000 = $0.05625/TH/day
Daily Bitcoin Earnings
Your share of the daily block rewards:
Daily BTC = (Your Hashrate / Network Hashrate) × Blocks per Day × Block Reward

          = (Your Hashrate TH/s / Network Hashrate TH/s) × 144 × 3.125
Example: 50 TH/s miner at 800 EH/s network:
Daily BTC = (50 / 800,000,000) × 144 × 3.125
          = 0.0000000625 × 450
          = 0.0000281 BTC (2,810 sats)
Daily Electricity Cost
Daily kWh = (Miner Power in Watts / 1000) × 24 hours

Daily Electricity Cost = Daily kWh × Electricity Rate ($/kWh)
Example: 1,000W miner at $0.12/kWh:
Daily kWh = (1000 / 1000) × 24 = 24 kWh
Daily Cost = 24 × $0.12 = $2.88
Daily Mining Revenue
Daily Revenue = Daily BTC × BTC Price
Example: 0.0000281 BTC at $100,000:
Daily Revenue = 0.0000281 × $100,000 = $2.81
Key Economic Metrics
Revenue Ratio (R) — “Heating Subsidy”
The percentage of electricity cost offset by mining revenue:
R = Daily Mining Revenue / Daily Electricity Cost
Example: $2.81 revenue / $2.88 electricity cost:
R = 2.81 / 2.88 = 0.976 (97.6%)
Interpretation:
- R = 0%: No mining revenue (broken miner or offline)
- R = 50%: Mining covers half your electricity cost
- R = 100%: Mining covers all electricity cost (free heating)
- R > 100%: Mining exceeds electricity cost (you profit while heating)
COPe (Coefficient of Performance - Economic)
A metric analogous to heat pump COP, measuring effective heating efficiency:
COPe = 1 / (1 - R)
| R (Subsidy) | COPe | Interpretation |
|---|---|---|
| 0% | 1.0 | Same as electric resistance heating |
| 50% | 2.0 | Equivalent to a basic heat pump |
| 75% | 4.0 | Equivalent to a high-efficiency heat pump |
| 90% | 10.0 | Extremely efficient |
| 100% | ∞ | Free heating |
| >100% | Negative | You’re being paid to heat |
Why COPe matters: It lets you directly compare hashrate heating to heat pumps. If your COPe is 3.0 and your heat pump’s COP is 3.0, they cost the same to operate. If COPe > COP, the miner is cheaper.
Effective Cost per kWh
The net cost of heat after mining revenue offset:
Effective $/kWh = (Daily Electricity Cost - Daily Mining Revenue) / Daily kWh
Example: ($2.88 - $2.81) / 24 kWh:
Effective $/kWh = $0.07 / 24 = $0.0029/kWh
This can also be expressed in other units:
Effective $/therm = Effective $/kWh × 29.307 kWh/therm

Effective $/MMBTU = Effective $/kWh × 293.07 kWh/MMBTU
Break-even Electricity Rate
The maximum electricity rate where R = 100% (free heating):
Break-even Rate = Daily Mining Revenue / Daily kWh

                = (Daily BTC × BTC Price) / Daily kWh
If your actual rate is below the break-even rate, you heat for free (or profit).
Fuel Comparison Calculations
Traditional Fuel Cost per kWh
To compare against hashrate heating, we convert fuel costs to $/kWh equivalent:
Fuel $/kWh = (BTU per kWh / BTU per Fuel Unit) × Fuel Price × (1 / Efficiency)

           = (3,412 / Fuel BTU Content) × $/unit × (1 / Efficiency)
Example: Natural gas at $1.50/therm, 92% efficiency:
Fuel $/kWh = (3,412 / 100,000) × $1.50 × (1 / 0.92)
           = 0.03412 × $1.50 × 1.087
           = $0.0556/kWh
Savings Percentage
Savings % = (Fuel $/kWh - Hashrate $/kWh) / Fuel $/kWh × 100
Example: Fuel at $0.0556/kWh, hashrate at $0.0029/kWh:
Savings % = (0.0556 - 0.0029) / 0.0556 × 100 = 94.8%
Understanding the Results
Primary Metrics
| Metric | What It Means |
|---|---|
| COPe | Economic efficiency compared to electric resistance (1.0). Higher = better. Compare to heat pump COP. |
| Subsidy % | How much of your electricity cost mining revenue covers. 100% = free heating. |
| Savings vs [Fuel] | Percentage savings compared to your selected fuel. Positive = hashrate heating is cheaper. |
| Effective Cost | Your net cost per unit of heat after mining revenue. Lower = better. |
Secondary Metrics
| Metric | What It Means |
|---|---|
| Break-even Rate | Maximum $/kWh for free heating. If your rate is lower, you profit. |
| Daily/Monthly BTC | Expected Bitcoin earnings at current network conditions. |
| Monthly Sats | Same as above, in satoshis. |
Status Indicators
The calculator displays a status based on your results:
| Status | Condition | Meaning |
|---|---|---|
| Profitable | R ≥ 100% | Mining revenue exceeds electricity cost. You profit while heating. |
| Subsidized | Savings > 0% | Hashrate heating is cheaper than your alternative fuel. |
| Loss | Savings ≤ 0% | Your alternative fuel is currently cheaper. |
Interactive Features
Sensitivity Charts
Each major metric (Savings, COPe, Subsidy) has an expandable chart showing how results change when you vary different inputs.
Available X-axis variables:
- Electricity rate - See how rate changes affect your economics
- Fuel rate - See sensitivity to fuel price fluctuations
- Miner efficiency - Compare different miner classes (J/TH)
- Hashprice - Model different Bitcoin market conditions
Reading the charts:
- The amber dot marks your current value
- Reference lines show important thresholds (e.g., 100% subsidy, heat pump COP)
- Steeper curves indicate higher sensitivity to that variable
Geographic Heat Map
The interactive map visualizes hashrate heating economics across all US states or Canadian provinces.
Features:
- Color gradient from red (poor economics) to green (excellent economics)
- Three metric views: Savings %, COPe, or Subsidy %
- Click any region to populate the calculator with that region’s rates
- Hover tooltip shows region name, rates, and all three metrics
- “YOU” row compares your custom inputs against regional averages
- Mobile-friendly table view with sortable columns
Using the map:
- Select which metric to display
- For Savings %, also select the fuel type for comparison
- Hover over regions to see details
- Click a region to model that location
Key Relationships & Sensitivity
What Has the Strongest Influence?
In order of impact:
-
Electricity rate — The most sensitive variable. A $0.05/kWh difference can swing results from profitable to loss.
-
Bitcoin price / Hashprice — Directly scales mining revenue. When BTC price doubles, mining revenue doubles.
-
Miner efficiency (J/TH) — More efficient miners earn more per watt, improving economics. However, less efficient miners output more heat per dollar of hardware.
-
Fuel rate and efficiency — Only affects the comparison to traditional heating, not absolute hashrate heating costs.
-
Network hashrate — Inversely affects earnings. When network hashrate doubles, individual earnings halve. This is the variable most outside your control.
Important Trade-offs
Electricity rate vs. fuel rate: Even with expensive electricity, hashrate heating can win if your alternative fuel is also expensive (e.g., propane in rural areas).
Miner efficiency vs. heat output: More efficient miners (lower J/TH) have better economics but often produce less heat. A 400W space heater won’t warm a large room regardless of its COPe.
BTC price volatility: Results are highly sensitive to BTC price. A 50% price drop roughly halves your subsidy percentage. Consider modeling worst-case scenarios.
Network hashrate growth: Hashrate tends to increase over time, reducing per-TH earnings. This is partially offset by BTC price appreciation and block reward expectations.
Use Cases & Examples
Example 1: Am I Better Off With Hashrate Heating?
Scenario: You currently heat with propane at $2.80/gallon with a 90% efficient furnace. Your electricity rate is $0.14/kWh.
Steps:
- Select your state (or enter rates manually)
- Set electricity rate to $0.14/kWh
- Select “Propane” as fuel type, enter $2.80/gallon, 90% efficiency
- Choose a miner (e.g., Avalon Mini 3)
Interpreting results:
- If Savings shows +45%, hashrate heating costs 45% less than propane
- If COPe shows 3.2, your miner is as efficient as a 3.2 COP heat pump
- If Subsidy shows 78%, mining covers 78% of your electricity cost
Example 2: What BTC Price Do I Need for Free Heating?
Scenario: You want to find the minimum BTC price for 100% subsidy (free heating).
Steps:
- Enter your actual electricity rate
- Select your miner
- In the Bitcoin Data section, manually adjust the BTC Price override
- Watch the Subsidy % metric
- Find the price where Subsidy reaches ~100%
Alternative method:
- Note your Break-even Rate result
- If your actual rate is below this, you already have free heating
- If above, the ratio tells you how much BTC needs to rise
Example 3: Which Region Is Best for Hashrate Heating?
Scenario: You’re flexible on location and want to find the best state for hashrate heating.
Steps:
- Set your preferred fuel type for comparison
- Expand the Geographic Heat Map
- Select “Savings %” as the metric
- Look for the darkest green regions
- Click promising states to see full details
Best regions typically have:
- Low electricity rates (< $0.10/kWh)
- High alternative fuel costs (expensive propane/oil)
- Cold winters (more heating demand)
Technical Notes
Data Sources
| Data | Source | Update Frequency |
|---|---|---|
| BTC Price | CoinGecko API | On page load |
| Network Hashrate | Mempool.space API | On page load |
| Regional Fuel Prices | Internal database | Periodic updates |
| Block Reward | Hardcoded | Updates at halvings (next: ~2028) |
Fallback Values
If APIs are unavailable, the calculator uses these defaults:
| Metric | Fallback Value |
|---|---|
| BTC Price | $100,000 USD |
| Network Hashrate | 800 EH/s |
| Block Reward | 3.125 BTC |
| Hashprice | $0.05/TH/day |
Currency Conversion
For Canadian users:
- BTC price is converted at 1 USD = 1.40 CAD
- All results display in CAD
- Fuel units use metric (litres, GJ)
Glossary
| Term | Definition |
|---|---|
| AFUE | Annual Fuel Utilization Efficiency. Percentage of fuel converted to heat. |
| Block Subsidy | The fixed BTC reward per block (currently 3.125 BTC). Halves approximately every 4 years. |
| COP | Coefficient of Performance. Heat output divided by electricity input (for heat pumps). |
| COPe | Coefficient of Performance - Economic. Exergy’s metric comparing hashrate heating to electric resistance. |
| EH/s | Exahashes per second. 1 EH = 1,000,000 TH. Measures Bitcoin network hashrate. |
| Fee % | Transaction fees as a percentage of total block reward. Models periods of high/low network demand. |
| Hashprice | Mining revenue per terahash per day, in dollars. |
| Hashvalue | Mining revenue per terahash per day, in satoshis. |
| J/TH | Joules per terahash. Measures miner efficiency. Lower = more efficient. |
| R | Revenue ratio. Mining revenue divided by electricity cost. Same as Subsidy %. |
| TH/s | Terahashes per second. Measures individual miner hashrate. |
| Total Block Reward | Block subsidy plus transaction fees. What miners actually earn per block. |
Solar Monetization Calculator
The Solar Monetization Calculator helps you determine whether Bitcoin mining is a better use of your solar energy than selling it back to the grid. By comparing mining revenue against net metering compensation, you can make an informed decision about how to maximize the value of your solar production.
Quick Start
- Choose your input mode - Select how you want to provide solar production data
- Enter your solar details - ZIP code and system size, or your own production numbers
- Select a miner - Pick from presets or enter custom efficiency
- Compare against net metering - See how mining stacks up against your utility’s compensation
- Review your results - See annual revenue, per-kWh earnings, and recommendations
The calculator uses live Bitcoin network data and updates results in real-time as you adjust inputs.
Understanding Input Modes
The calculator offers three ways to model your solar production:
Mode 1: Estimate (Location-Based)
Use this mode if you’re planning a new solar installation or want a quick estimate.
| Input | Description |
|---|---|
| ZIP Code | Your location for solar irradiance data |
| System Size (kW) | DC capacity of your solar array |
The calculator uses the NREL PVWatts API to estimate annual solar production based on:
- Local solar irradiance (kWh/m²/day)
- Typical system losses (14% default)
- Fixed south-facing tilt (latitude-optimal)
Example: A 10 kW system in Phoenix, AZ might produce ~18,000 kWh/year, while the same system in Seattle, WA might produce ~12,000 kWh/year.
Mode 2: Production (User-Provided Generation)
Use this mode if you know your actual or expected solar production.
| Input | Description |
|---|---|
| Annual Production | Total kWh your system generates per year |
| Monthly Breakdown (optional) | Production by month for seasonal analysis |
When to use this mode:
- You have an existing system with historical data
- You have a quote with production estimates
- You want to model a specific scenario
Mode 3: Excess (Net Metering Comparison)
Use this mode to specifically compare mining your excess solar against net metering.
| Input | Description |
|---|---|
| Excess Solar | kWh you export to the grid (don’t self-consume) |
| Net Metering Type | How your utility compensates exported solar |
| Compensation Rate | What you receive per kWh exported |
This mode is ideal if you already offset your own usage and want to optimize what happens to the surplus.
Net Metering Comparison
Understanding Utility Compensation Types
Utilities compensate exported solar differently. The calculator models three common structures:
Bill Credits (Full Retail Rate)
How it works:
- Each kWh exported earns a credit equal to your retail electricity rate
- Credits offset future electricity purchases
- Unused credits typically expire after 12 months
Typical rate: ~$0.12/kWh (varies by location)
Where it’s common: California (legacy NEM 2.0), many Northeast states, Colorado
Pros: Highest compensation rate Cons: Credits can expire; no cash value
Net Billing (Avoided Cost Rate)
How it works:
- Each kWh exported is credited at a lower “avoided cost” or wholesale rate
- Credits are applied instantly to your bill
- Typically 30-50% of retail rate
Typical rate: ~$0.05/kWh (varies widely)
Where it’s common: California NEM 3.0, Arizona, Idaho, Nevada
Pros: Credits don’t expire Cons: Much lower compensation than retail
Annual Cash-Out
How it works:
- kWh credits accumulate throughout the year
- Annual excess is paid out at a low wholesale rate
- Monthly credits may be at higher rate
Typical rate: ~$0.02-0.04/kWh for annual payout
Where it’s common: Xcel Energy territories, TVA utilities, some rural co-ops
Pros: Receive actual cash for excess Cons: Very low compensation rate
Comparison Table
| Type | Typical Rate | Annual Value (5,000 kWh) |
|---|---|---|
| Bill Credits | $0.12/kWh | $600 in credits |
| Net Billing | $0.05/kWh | $250 in credits |
| Annual Cash-Out | $0.02/kWh | $100 in cash |
Understanding the Calculations
Core Mining Formula (kWh-Based)
The key insight: Only miner efficiency matters for solar mining economics—not power draw or hashrate individually.
Sats per kWh = (1000 / Efficiency_J_TH) × (Hashvalue / 24)
Where:
- 1000 converts kWh to Wh
- Efficiency_J_TH is miner efficiency in Joules per Terahash
- Hashvalue is sats earned per TH per day
- 24 converts daily hashvalue to hourly
Why this works:
A miner’s hashrate is directly proportional to its power consumption:
Hashrate (TH/s) = Power (W) / Efficiency (J/TH)
So for any amount of energy (kWh), the BTC earned depends only on efficiency:
Total Sats = kWh × 1000 × (1 / Efficiency) × (Hashvalue / 24)
Example:
- Miner efficiency: 20 J/TH
- Hashvalue: 60 sats/TH/day
- Solar production: 1 kWh
Sats = 1 × 1000 × (1/20) × (60/24)
     = 1000 × 0.05 × 2.5
     = 125 sats per kWh
Daily/Monthly/Annual Revenue
Daily BTC = Daily kWh × Sats per kWh / 100,000,000

Monthly BTC = Monthly kWh × Sats per kWh / 100,000,000

Annual BTC = Annual kWh × Sats per kWh / 100,000,000

USD Value = BTC × BTC Price
Revenue per kWh
$/kWh (mining) = Sats per kWh × BTC Price / 100,000,000
Example: At 125 sats/kWh and $100,000 BTC:
$/kWh = 125 × 100,000 / 100,000,000 = $0.125/kWh
Net Metering vs Mining Comparison
Mining Advantage = Mining $/kWh - Net Metering $/kWh

Recommendation:
- If Mining $/kWh > Net Metering $/kWh → "Mine your excess solar"
- If Mining $/kWh < Net Metering $/kWh → "Keep net metering"
- If close (within 20%) → "Consider mining for BTC accumulation"
Bitcoin Network Data & Overrides
Live Data Sources
| Metric | Source | Description |
|---|---|---|
| BTC Price | CoinGecko | Current Bitcoin price in USD |
| Network Hashrate | Mempool.space | Total computing power securing the network (EH/s) |
| Hashprice | Calculated | Revenue per TH/day in dollars |
| Hashvalue | Calculated | Revenue per TH/day in satoshis |
The Three-Knob Override System
For “what-if” scenario analysis, you can override live data using three independent controls:
Knob 1 - Price Group:
- Edit BTC Price and hashprice auto-calculates, OR
- Edit Hashprice and BTC price auto-calculates
Knob 2 - Network Group:
- Fee % anchors this group
- Edit Network Hashrate and hashvalue recalculates, OR
- Edit Hashvalue and network hashrate recalculates
Knob 3 - Fee Percentage:
- Slider from 0-99%
- Models transaction fee environments
- When adjusted, hashvalue recalculates (network hashrate held constant)
Click “Reset to live data” to clear overrides.
Understanding the Results
Primary Metrics
| Metric | What It Means |
|---|---|
| Annual BTC | Total Bitcoin earned from mining your solar production |
| Annual USD | Dollar value of mining revenue at current BTC price |
| Sats per kWh | Satoshis earned per kilowatt-hour of solar used |
| $/kWh (Mining) | Dollar value earned per kWh when mining |
Comparison Metrics (Excess Mode)
| Metric | What It Means |
|---|---|
| $/kWh (Net Metering) | What your utility pays per kWh exported |
| Mining Advantage | Difference between mining and net metering $/kWh |
| Annual Difference | Total dollar difference over a year |
| Recommendation | Whether to mine or stick with net metering |
Monthly Breakdown
The calculator shows month-by-month projections:
- Solar production (kWh)
- BTC earned
- USD value
- Comparison to net metering
This helps visualize seasonal variations—summer months typically produce more solar and thus more mining revenue.
Miner Selection
For solar mining, efficiency (J/TH) is the only spec that matters. The calculator includes presets:
| Miner | Efficiency (J/TH) | Category |
|---|---|---|
| Avalon Mini 3 | 21.3 | Space heater class |
| Avalon Q | 18.9 | Space heater class |
| Whatsminer M64 | 21.9 | HVAC class |
| Bitmain S19k Pro | 23.0 | HVAC class |
| Bitmain S21 | 17.5 | Latest generation |
| Antminer S9 | 103.7 | Legacy/budget |
Custom input: Enter any J/TH efficiency value directly.
Note: Lower J/TH = more efficient = more sats per kWh. A 20 J/TH miner earns ~5x more per kWh than a 100 J/TH miner.
Use Cases & Examples
Example 1: Should I Mine My Excess Solar?
Scenario: You have a 10 kW system producing 14,000 kWh/year. After self-consumption, 5,000 kWh goes back to the grid. Your utility offers net billing at $0.045/kWh.
Steps:
- Select “Excess” input mode
- Enter 5,000 kWh excess
- Select “Net Billing” at $0.045/kWh
- Choose a miner (e.g., Avalon Mini 3 at 21.3 J/TH)
- Review comparison
Possible result:
- Net metering value: 5,000 × $0.045 = $225/year
- Mining revenue: ~$400/year (at current network conditions)
- Recommendation: Mine your excess solar
Example 2: New Solar Installation Planning
Scenario: You’re installing a 12 kW system and want to know if you should oversize for mining.
Steps:
- Select “Estimate” mode
- Enter your ZIP code
- Enter 12 kW system size
- Compare mining revenue to net metering options
- Model larger systems (15 kW, 20 kW) to see diminishing returns
Example 3: What BTC Price Makes Mining Beat Net Metering?
Scenario: Your utility offers generous $0.10/kWh bill credits. At what BTC price does mining become better?
Steps:
- Enter your solar production
- Set net metering to $0.10/kWh
- Use Knob 1 to adjust BTC price
- Find the price where Mining $/kWh exceeds $0.10
Key Relationships & Sensitivity
What Drives Solar Mining Economics?
In order of impact:
-
Miner efficiency (J/TH) — The single most important variable. Upgrading from 100 J/TH to 20 J/TH increases revenue 5x.
-
Bitcoin price — Directly scales USD revenue. When BTC doubles, dollar revenue doubles.
-
Net metering rate — The lower your utility pays, the more attractive mining becomes.
-
Network hashrate — Inversely affects earnings. Higher network hashrate = less BTC per TH.
-
Fee % — Higher transaction fees increase miner revenue (when network is congested).
Important Considerations
Net metering is risk-free: Net metering compensation is guaranteed (at current rates). Mining revenue varies with BTC price and network conditions.
Mining accumulates BTC: Even if current USD value is similar, mining lets you accumulate Bitcoin—potentially valuable if price appreciates.
Utility rate changes: Net metering policies are changing rapidly. Many utilities are reducing compensation (NEM 3.0 trend). Mining provides optionality.
Miner efficiency improvements: New miner generations improve efficiency ~20-30% every 1-2 years. Future miners will earn more per kWh.
Technical Notes
Data Sources
| Data | Source | Update Frequency |
|---|---|---|
| BTC Price | CoinGecko API | On page load |
| Network Hashrate | Mempool.space API | On page load |
| Solar Estimates | NREL PVWatts API | On ZIP code entry |
| Block Reward | Hardcoded | Updates at halvings |
PVWatts API Parameters
When using Estimate mode, the calculator queries NREL PVWatts with:
- System capacity: User-provided kW
- Module type: Standard (crystalline silicon)
- Array type: Fixed (roof mount)
- Tilt: Location latitude
- Azimuth: 180° (south-facing)
- System losses: 14%
Fallback Values
If APIs are unavailable:
| Metric | Fallback Value |
|---|---|
| BTC Price | $100,000 USD |
| Network Hashrate | 800 EH/s |
| Block Reward | 3.125 BTC |
Glossary
| Term | Definition |
|---|---|
| Avoided Cost | The cost a utility avoids by not generating or purchasing power. Basis for net billing rates. |
| Bill Credits | kWh credits that offset future electricity purchases, typically at retail rate. |
| Excess Solar | Solar production exported to the grid (not self-consumed). |
| Fee % | Transaction fees as a percentage of total block reward. |
| Hashvalue | Satoshis earned per terahash per day. |
| J/TH | Joules per terahash. Measures miner efficiency. Lower = better. |
| Net Billing | Compensation for exported solar at avoided cost rate (lower than retail). |
| Net Metering | Utility programs that credit solar owners for exported electricity. |
| NEM 3.0 | California’s new net metering policy with reduced export compensation. |
| NREL | National Renewable Energy Laboratory. Provides PVWatts solar estimation API. |
| PVWatts | NREL tool for estimating solar production based on location and system size. |
| Sats per kWh | Satoshis earned per kilowatt-hour of energy used for mining. |
Reference
Resources and support for your Exergy system.
Pages
External Resources
| Resource | Description |
|---|---|
| Support Forum | Community support and discussions |
| GitHub | Open source integrations and code |
| Live Demo | Try the Exergy dashboard |
Support
Get help with your Exergy system through our community forums or contact us directly.
Community Forums
| Forum | Description |
|---|---|
| Hardware Support | Questions about miners, brains, and physical equipment |
| Software Support | Home Assistant, integrations, and configuration help |
| Services Support | Questions about Exergy services and subscriptions |
Contact
- Contact Exergy directly for sales, partnerships, or private inquiries
FAQ
Frequently asked questions about Exergy systems.
Check out the FAQ page on our community forum to see answers to common questions or post your own.
- Browse the Community FAQ for more Q&A
Still Need Help?
- Ask in the Hardware Support Forum
- Ask in the Services Support Forum
- Ask in the Software Support Forum
- Contact Exergy directly